Welcome :
The Rochdale Owners Club was formed in June 1981 by a group of owners keen to establish a club exclusively for the Rochdale marque.
- History
- News
- Olympic torch review
- Events
- Membership
- Regalia
- Spares
- Articles
- Owners' Cars
- Links
- Forum
- Contacts
- Olympic Workshop Manual


Past Magazines
Technical Article
Glassfibre repairs
"My Method" By Keith Hamer
There are several reasons why one may have to repair glassfibre, and its laminates. Some of these reasons are detailed below.
1. Accident damage.
2. Stress cracking as the result of accident damage.
3. Gellcoat scratches.
4. Delaminating and osmosis.
Glassfibre (GRP Glass Re-enforced Plastic) is unlike most other materials used in the motor industry. It reacts differently to Steel and Aluminium when involved in an accident; unlike Steel when GRP is hit hard enough it will fracture and split into pieces. These pieces can theoretically be brushed up and glued back together like a 3D jigsaw puzzle, whereas Steel and aluminium will stretch making it very difficult to regain it original shape without vast amounts of skill and experience.
OK. so how does one repair for instance a damaged front wing on your beloved Rochdale. Well first job is to identify all the cracks, some of which may not be all that apparent because the glass fibre has cracked whilst the paint covering it remains free from any signs of cracking.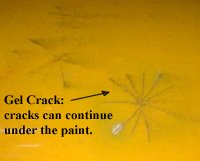 From experience these cracks are the most difficult to treat as no matter how careful you are there will probably be one or two which come through months after the repair, so bear in mind that you may have to do some touching up at a later date. Having identified the extent of the cracking the first, and potentially the most frightening job is to open up all the cracks which have gone all the way through, the only sure way to do this is with a saw blade of some description, simply follow the path of the crack with the saw blade until the extremities are reached. The next job is to grind the cracks to a deep feathered edge, that is all but through the panelwork, continue this process with all the sawn cracks and then move on to do the same only not quite so deep (just through the gellcoat will do) to all the other cracks in the area to be repaired. It is now time to move to the inside of the panel, and grind this in the area of the repair to give the glassfibre which you are subsequently going to lay up on the inside of the panel a good key. At this stage it is a good idea to degrease the inside of the repair with some acetone.
Now for the tricky bit, but before I go on to tell you how to lay up fibreglass here's a quick lesson on glass matting. Glassfibre matting comes in various different types, these have differing properties and are used for different purposes:-
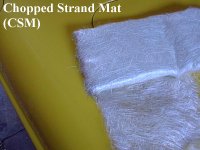 |
Chopped Strand Mat. (CSM) This comes in various thicknesses and is referred to by weight in ounces, i.e. 1/2 oz, 1oz, etc., and is used for structural work, to give body. I use this as a 'resin carrier' in the D.R.K. wings, the second layer is of woven cloth which can be difficult to 'wet' out unless you use a carrier for the resin. |
|
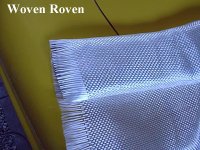 |
Woven Cloth. (Sometimes referred to as Woven Roving) This also is available in various thickness' and is referred to in either grams/Sq. Metre, or ounces/ Sq. Yard, and is used over the CSM to give good flex qualities. |
|
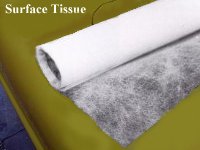 |
Surface Tissue. Generally available in only one thickness, and is used to provide a surface onto which you can start the surface preparation. I rarely use tissue as either of the other two types roughened will take a surfacer. |
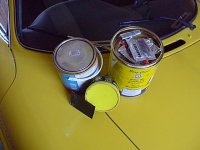
Now down to the nitty-gritty. Although there are several types of resin, the only one we need to know about is "lay up" resin; this is a polyester resin into which you must add hardener. This hardener is a peroxide and its sole purpose is to make the polyester resin go hard. The amount of each will depend on a number of factors the most important of which is temperature; if it's hot then you won't need as much hardener as if it is cold. As a guide in the summer months I mix 2½ pints of resin to 1 capful of hardener, (the cap on my hardener is about the same size as that on a 1 gallon oil container). However in the winter months, bearing in mind I work in a cold workshop with minimal heating, the quantity of hardener is often doubled. Something else to bear in mind is the size of the lay-up you are going to be doing and the speed you can work.
Experience is the only sure way to learn how fast you want the resin to go off. Having cut up some suitable bits of chopped strand mat and mixed the resin we can start to lay up. Using an old clean paintbrush, paint the area to be repaired liberally with resin, and once this is done place the first strip of CSM onto the surface using the resin previously painted on as glue. Now wet it thoroughly with the paintbrush, and once the mat is wetted you can start to stipple the repair with the brush to release the individual strands of the mat (they are supplied loosely bonded together and the resin frees this bond to allow you to use the mat). Don't be afraid to move the strands about; the finished article should have all the strands well amalgamated, and once the first layer is smoothed out you can build up until the repair is done.
Depending upon whether the repair is on a vertical, horizontal, or under surface will dictate how many layers will stick before the whole lot falls off - experience alone will tell you this. The only secret to a good job is to wet the mat out thoroughly all over before trying to remove all the trapped air; this can be done by stippling with a brush, though some prefer to use a roller, similar to a paint roller but with either steel washers or a serrated steel tube in place of the lamb's wool. Once all the air is out and the inner lay-up has gone off the same process can be repeated on the outside, layer on layer until the repair is slightly proud of the panel.
Now take a break. The repair you have just done should be left for a short while to cure fully before the next stage - 24 hours should be enough but a week isn't too long if you only work on the car at weekends.
I have been asked the question: how do you remove the gellcoat before proceeding with a repair? The simple answer to this is that I use an angle grinder for both the gellcoat and to remove any glassfibre which has after a repair ended up proud of the surface of the panel. That thought takes me on to the next process of the repair: having done all the rough laying up it is time to regain the shape in the panel. The first step is to once again grind the surface of the repair so that the panel is as close to its original shape and size as possible - the rest as they say is easy.
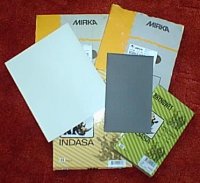
 Now the panel being repaired is close to the right shape I use a good quality body filler, something like Smooth 7, which is available from most paint suppliers such as Autopaint, or Elison Valdis, and comes in big tubs. Don't fiddle about with little ones from Halfords and the like, it's false economy because you will always need more than you have. Mix the filler as per the instructions and with a good quality spreader smoothly spread the area with the filler, try to follow the contours of the panel so that once the filler has gone off you can rub your palm across it without discomfort. If you have a good eye the repair should now be the same shape as the rest of the car but a bit rough. To smooth the filler at this stage use a block and some 80 grit production paper 'dry' (that's the white stuff - the grade of paper is printed on the back, the higher the number the smoother the paper). Now the panel is the right shape and as smooth as you can make it, you can now ( if you're not too confident) spray a very thin guide coat of a dark cellulose paint over the repair; once this is dry lightly rub it off with 240 grit paper 'wet' but be careful, all you are trying to do is remove the paint to show where the panel requires refilling. Repeat the process above until you have a panel which no longer has any traces of the guide coat colour present and is smooth and the correct shape.
Now and only now can you go on to the next bit which is stoppering the repaired panel. This process is necessary because most, if not all, fillers will contain minute air bubbles which will show through the paint finish. There are two possibilities for this job: you can use knife stopper spread over the whole of the repaired area with a spreader or, if you have the equipment, you can use several coats of a spray-on stopper, left to dry and flatted between each coat. I prefer the spray method as it is quicker and makes life easier, but does require quite a large investment in equipment. All things are relative however - a good quality paint job done in 2 pack will set you back anything from £1,200 and I have recently seen the bill for a vintage Alvis at £7,000 so the £300 spent on purchasing a decent compressor and a small spraygun is put somewhat into perspective, but I digress...
Having got to the stopper stage it is now time to move on to 400 grit paper (wet of course), still on a block, and smooth the panel until it is even and smooth without going through the stopper. Now you can spray a couple of good coats of primer onto the repair and after flatting this down and drying the area spray the topcoat to finish the job. No real advice to give here, practice makes perfect and the wetter the paint the better the finish. You need to put as much paint on as is possible without putting so much an that it starts to fall off, curtains are OK in the house but they don't belong on a Rochdale.
The guy who taught me how to spray used to fine me £1 per run, which when you're earning £4 per hour really does help to focus the mind on the job in hand, and you soon learn how to avoid runs. After about a week you can polish the repaired panel or indeed the whole car to a beautiful mirror finish. This process in itself is a bit of an art, and there are a few ways to obtain a good finish but these all depend on the time and care taken over the preceding weeks. If the paint has been put on well and the area in which it was sprayed was nice and dust free then it should be simply a matter of using a good proprietary cutter such as T/Cut, take time over this and once you have finished cover the panel with a good quality 'silicone free' polish.
If however your panel isn't perfect you can, with care, give it a light 'nib' with some very fine paper - I would say 1,000 grit very wet with a little washing up liquid in the flatting water. This is possibly the only occasion when it's OK not to use a block but be sure to use the paper in the palm of your hand NOT the fingers. When the panel is evenly dull you can go onto the stage of cutting the shine back into it, as above, and once again finish with polish.
Keith Hamer - Founder member of the Rochdale Owners Club
----------------------------
Copyright © Rochdale Owners Club
Last Update