MAGAZINE
No 102 SUMMER 2005
Edlines
A big thank you to all those who have helped to make this a bumper
issue. We have minutes from the well-attended AGM, reports on the Capesthorne
show, news on Rochdale GTs (which feature strongly on the page if not on the
road), some crucial info for Olympic owners from Derek Bentley, info. on oil
applications and the usual variety of topics in members letters and articles.
The next main event which many of us look forward to is the
Historic Specials bash in August see advert. If you visit a show of
particular interest do write a report on it for the rest of us.
I'm a little surprised at the minimal response to the
subject of originality raised in the last issue. Are we all sitting on our
hands? I know I am!
Now a word from our secretary Alaric:
It's always interesting looking at members' application
forms. This year a couple of desperate pleas stood out: Keith Barry Higgins
from Stockton on Tees has a Phase II with 1865cc MGB engine fitted. It is on
the road, but has a problem "It destroys rotor arms - Help! - It's on the
road, or verge if rotor arm shorts out again". I've heard of this before,
but can't for the life of me remember what the answer was. Also Barrie Jones
from Milton Keynes has a Phase II and needs someone to remanufacture window
frames. Writing from memory, the original aluminium frames were sourced from
boat supplies, and I believe may have come in two widths. A few years ago,
several members used the stainless steel frames from Morris Travellers cut and
welded, and they do look nice, and will probably last longer than the aluminium
ones. If anyone can help with either of these problems, write to Alan, and
also let me know and I will forward your replies on to the members.
Capesthorne 2005
Well, it was another successful Capesthorne Show, marred
only slightly by a heavy downpour in the early afternoon.
There were 29 members and friends at the show for the
Saturday afternoon. The driving test, delayed by a heavy downpour and
thunderstorm, was won by Malcolm McKay driving Derek Bentleys Phase I. The
evening meal was at a new location on the road to Congleton, and despite not
having any proper beer, seemed to be a success. We were treated to a
fascinating discussion on the development of the Olympic led by Derek Bentley.
If you haven't come on the Saturday afternoon before, do try to make an effort
next year; it's well worthwhile.
This year we had about the same number of Classics and Kit
Cars as last year, 11 Olympics, 1 Riviera and Mick Steads Autobee Pacemaker,
now in running if not roadworthy condition.
The prizes were judged by Malcolm, and graciously presented
by Hilary Parker. In the Classics, first place was a Renault Juvaquatre NSL
907, owned by Ray Cresswell, the only one on the road in this country; second
was the Austin-Healey Sprite DNX 182K belonging to club member Mark Butler and
in third place was a Mini Marcos DVD 661J belonging to Howard Plant.
In the kit car section, the prizes were awarded as follows:
First place Dax Rush V8 4.6 G98 YJA owned by John Kinsey
and built 3 years ago;
Second place went to a Banham X21 (Metro based) K245 VNF
which was built two years ago and has been used every day since;
Third place was a Pilgrim Bulldog Tara ROB 277R driven by
the builder and built 17 years ago;
Visitors choice was a GTD 40 V50 GTD
The Which Kit Car? award went to a Vintage Motor Company of
Doncaster limousine LUI 8747.
The most important prizes are, of course, the ones awarded
to Rochdales, so here goes: as mentioned before, Malcolm McKay won the driving
test; the prize for highest aggregate mileage to both the AGM and Capesthorne
was awarded once again to Colin Breakspear, and the prize for Best Rochdale
went to the Phase I Olympic 779 CUG of Tony Wright.
Special thanks are due to those who laboured so hard to get
the show organised: Ron Scarfe, Brian Easton, Roger Coupe, Dave Milner and Paul
Narramore. Also to Jane Devons who manned (if that is the right word?) the
club tent, assisted by Milly, Gail, Ilka, Hilary and Jane. Thank you.
Miscellaneous Meanderings
There are a number of new members to welcome to the club:
Mark Butler who is looking for an Olympic, Tim Cutts, who
is a neighbour of Colin Breakspears in Germany, Peter Gascoigne, Derek Johnson
who has two Olympics XRB 834F and SF 9505, Lees and Co brewery mentioned in the
last magazine have joined. Jack Thomas from South Wales has rejoined and
Patrice Wattinne from France has acquired the ex-Roy Dawson Triumph-chassied
GT. Moraigh Butler also joined at Capesthorne having outbid Malcolm and
purchased a GT on eBay for £127! There are still bargains to be had!
The club is hoping to be invited to the publicity launch
for JW Leess GT, more details when we have them. It would be great to get a
bunch of Rochdales back in Rochdale again!
Finally, I have nearly three crates full of back issues of
the magazine. They are no use to anyone in our loft, so for the next few
months, we are having a BOGOF two for one sale. Not all are available, but let
me know your requirements.
Alaric
Spendlove

Some of the class winners - Photos: Malcolm McKay
Chair
Chat.
Back in April when we had our AGM the weather was a bit on
the cool side, but the company was as ever extremely warm and friendly. The all
Olympic line up of Rochdales came up to the now usual high standard. The
business part of the program was completed in record time, after a very
interesting and informative presentation about the club Website by Aubrey
Richardson. One suggestion put forward at the meeting was to try to set up a
club week end at Rochdale, linked with the Rochdale Brewery who have acquired a
Rochdale GT to use for publicity purposes. We will keep you all informed of
any progress.
Next on the calendar was our annual Cheshire Kit Car Show.
The weather was mixed both on the Saturday and the Sunday, however it did not
dampen anyone's spirits and a good time was had by all. The encouraging thing
for me is the ever increasing number of members and friends that turn up to
help Ron and his team to get the site marked out ready for when the public
arrive on the Sunday. We had 29 to sit down for an enjoyable evening meal on
the Saturday at a new venue, after which Derek Bentley gave an interesting and
enlightening talk on the background of the Olympic. A big thank you must also
go to all who tuned up on the Sunday and so willingly volunteered to help with
the different tasks that made the day run so smoothly.
On the home front I have to admit that there has been very little
progress on "Sows Ear", my time having been taken up with getting my
boat back in the water for the season. My aim however is to have something to
show for the Specials Day in August, so see you all then .
Roger.
* * * * * * L E T T E R S * * * *
* *
Dear Editor,
I have recently joined the Rochdale
Owners Club and I am now looking for an Olympic to buy. Now I suspect that
there are a few of you out there who have more than one car sitting around doing
nothing, or even one car sitting around doing nothing! Well, if this the case
can I please buy it? What I'm looking for is a Phase 1 or Phase 2 Olympic
which I could use for racing. It doesn't have to be a running car; a rolling
shell would be fine.
I work for a company that builds classic racing cars, and
restores classics for the road, (current projects, an FIA spec Jaguar XK150S
FHC, and the ex-George Harrison Mini Cooper) so I know what's involved. So if
I buy your car it won't go from the back of your garage to the back of mine
never to run again! I am well known to Malcolm McKay, it was he who got me
started on this with his talk about his supercharged example, and got me hooked
when I visited his 'collection' last Friday.
What I want to do is prepare the car well, and try put
Rochdale somewhere on the racing radar where they ought to be. So if anyone
can help me in my search I would be most grateful.
Yours faithfully
Peter
Gascoigne
Email: pfgasket@aol.com
From Gordon Cowley Rochdale GT
Dear Alaric,
It was always going to be a hard task to get the Rochdale GT to Tasmania
for the Ford 8 and 10 Sidevalve National Rally in February 2005 and it never
quite made it. I worked on it basically for five weeks full time but there was
just too much to do. I eventually gave up to do a bit of work on my c1952
Anglia Tourer for the National Rally. It was a 100-yard car when I started and
I turned it into a 50-yard car. Even the regular Rally attendees noticed that
it was different.
There is some progress to report on the Rochdale GT. The boot has been
finished but I still need to nut out and do the fuel filler. All the LHS Ford
Ten fuel filler holes have been filled and fibre glassed. I reinstated the
engine bulkhead, built a three-part gearbox and prop shaft tunnel and carried
out various body repairs including frenching in the new tail lights. I used
fibreglass sheet, aluminium flat and angles, plastic body filler and fibreglass
resin and mat to do all those jobs. I had what seemed to be a dodgy repair done
on the pax side 'A. pillar. I was not keen to remove the windscreen to fix it.
When I tried to lift the body off the chassis (with a chain block and rope
through the door openings) to put it on the rotisserie to finish the underside
fibre glassing I managed to pull half the roof off. I broke the 'A' pillar in
the bodged up area, I pulled the roof off the 'B' pillar and split the body
between rear side and back windows. Without my fibre glassing experience I
would have probably burst into tears and gone to bed for a week. As it was, I
just looked at it with the roof flapping in the breeze and thought I can fix
that and I could and I did.
I ended up cutting into the RHS of the engine bay (see page 7 mag no 97
to see why) to make room for the air cleaner and I have rebuilt the area around
the air cleaner with a fibre glass sandwich to keep the strength in the area. I
used 3 mm balsa sheet covered with fibre glass sheet both sides and used
plastic body filler to stick it together. One of my favourite aeroplanes is a
D.H. Mosquito. I have a 20 mm alloy spacer and then a 55 mm air cleaner added
to the carby hence the need for a bit more body cutting and rebuilding. I guess
that in the end after I have attended to the cooling system I will still have
most of the bonnet sides in place with a new profile for the top of the bonnet.
Whatever covers the air cleaner will be part of the bonnet.
The rotisserie has been of great use as I can turn the body over and
fibre glass all the joins in the fibre glass sheet that I have used to make the
body airtight and waterproof. I still have to put the body back on the
rotisserie for more finishing work but currently I have to do some
housekeeping things, so for a short time the Rochdale GT will sit in the
shed.
I had set up the body / chassis quite low (100 mm, the minimum allowed)
and due to interference between the front wheel arches and the front wheels I
decided that it would be easier to lift the body / chassis than open out the
front wheel arches. I lifted the body up by lowering the axles and then what
seemed an insurmountable problem arose. It was the usual thing however; it was
just a case of a solution waiting to be found. I ended up with a drag link
that wanted to be where the radius rod was. I will leave the original steering
arms and tie rod to do their job underneath the radius rod. I will use the two
top backing plate bolts on the LHS to attach a new steering arm to the LHS stub
axle. That way the drag link fits comfortably over the radius rod and I have
scope to lower the body and attend to the front wheel arches later.
I was told initially that for ease of registration in S.A.
that I should import a vehicle with registration documents. In the end no
documents were supplied so I asked the local Reggo Authority if my vehicle
would be accepted as a 1961 Rochdale GT and what rules it needed to comply
with. I sent 28 pages of supporting documents.
At that point I expected all sorts of problems. I have a
reply and virtually all I have to do is present the Rochdale GT in a roadworthy
condition with brakes, windscreen wipers etc and with appropriate lights in all
the right places and the 1961 Rochdale GT will be registered. As a result my
next deadline will be when my approval to register runs out in December 2005.
Remarks on convert to 100E power page 4 mag no 98. I
converted my c1952 Anglia Tourer to 100E power and found it a worthwhile
exercise. The gains are slipper big ends (use a later 100E engine) and a built
in water pump. There are changes in the ports, valves and camshaft in the 100E
engine which give you more power as well. See page 5 mag no 97 for other
detail. You do need plenty of oil pressure to run these engines at high RPM
figures. I did two sets of cranks and bearings before changing to an external
oil pump. I used the pressure pump section from a racing type dry sump system.
It is driven at half engine speed from the nose of the crankshaft by a toothed
belt. The Ford Ten engine runs 40 pounds at the front of the engine and the
100E runs 50 pounds at the rear of the engine. The oil comes out of the wet
sump, through the pump, through a full flow oil filter and back into the engine
via a 100E side plate with the oil pressure switch hole opened up to gas. The
hole where the internal oil pump fits is blanked off. Ford Ten and 100E engines
can lose a lot of oil pressure through the centre camshaft bearing through
normal wear. I bought some 100E semi finished camshaft bearings. They were
fitted to the 100E block and the Ford Ten block line bored so that the semi
finished 100E bearings would fit the Ford Ten block. When the camshafts got a
new profile all the camshaft bearings on each camshaft were ground to the same
size. The semi finished 100E camshaft bearings were then line bored to fit the
appropriate camshaft.
The biggest problem with the conversion is the sump. The
deep part of the sump is at the wrong end of the engine. You can use 40 mm of
the top of the 100E sump to fit the 100E engine. You can weld a Ford Ten sump
less the top 40 mm to the 100E sump. You can remove the bottom section of the
100E sump and add the bottom section of a Mk 1 Cortina sump to get more oil
volume. You can drop the base of the sump to the same level as the bottom of
the radius rod. Make sure that the oil will run out of the drain in the sump.
If you do not believe that oil is really necessary in an engine or you think
that it is always really cold in the UK you can cut off the front of the deep
part of the 100E sump so that it fits behind the steering gear. You will have
to modify the oil pick up as well and there are many ways to do that.
That's it for the moment,
Kindest regards,
* * * * * * * * * * * *
From Barry Higgins Olympic Phase 2
Re modified Olympics
Not long after I built my first Rochdale GT in 1958 Jack Dowson (NE tuner
and Rochdale bodyshell agent) told me about the new monocoque shell being
designed. I wanted one of these rust-free bodies. In 1978 I bought the last
car made in 1975. It was fitted with a Riley 1.5 engine, gearbox and back
axle. I was pleased it had the torsion bar front suspension and not the
Thompson layout as fitted to the Herald, Elite etc as they were always needing
new bushes. So the factory had made a modified car! I let the
bodyshell cure until 1997 when I retired, and started to work on it, getting
it on the road in 1998.
It was noisy, low geared and leaked like a sieve. I cured the leaks and
decided to put an MGB engine in. They are even making new bodyshells and
everything you want for an MGB is available now (I can't stand buzz-boxes; it's
like sitting inside a dentists drill as you row it along with the gear
lever). The external shape and size is identical to the Riley 1.5 so it looks
original, everything fits, including the engine mounts, they can be bored out
to 2 litre (you can fit Ford pistons) and tuned up to 180 BHP quite cheaply. (I
bet you a tenner you won't get 180 BHP from an MGB engine without spending big
money Ed)
I started with a Marina, late type thin wall block engine which weighs
less than a Riley 1.5 and took it up to 1865cc and approx 120 BHP (no cogged
belts to snap and blow up your engine). (I bet you another tenner you don't
get 120 BHP from your MGB engine, as measured on a calibrated dyno Ed)
I have found overdrives heavy, complicated and unreliable, whereas an
extra couple of cogs on the back of a 4-speed box to make a 5 only adds about
1' lbs. (Agreed; also, there is no need to widen the propshaft tunnel either
Ed). I talked to my friend Terry, who has his own gearbox and axle
business, who said the best box was a Ford Mk9. He built me one with a higher
step up than an overdrive, fully reconditioned, for £225 Re originality, a
1975 box looks almost the same, but you never see it anyway.
My 1962 Lotus Elite was the best handling car I have ever driven (except
for racing cars) but I remember a young Elite owner saying to Jack Dowson I am
thinking of putting wider wheels on. Jack said: Why, is it too fast for
you? Wider wheels will slow it down and is the steering too light? Colin
Chapman knows what he is talking about you know. Bearing this in mind I am
keeping 155x14 tyres on the front, but for higher gearing have put 165x14 on
the rear, which gives me 2800 rpm at 70 mph. I have found that one of the best
ways to quieten a car is higher gearing and of course it improves mpg and
reduces engine wear.
I would not want to fully modernise my Olympic. As long as I am able
to service it myself I want to keep things as simple as possible eg I find
dynamos very reliable, I can get a recon one for £20 and I can carry brushes
and bushes in the car, a new (MGA) voltage regulator for £23, a Ford XR3 (more
powerful) battery for £24 and I can charge it without disconnecting anything.
My Scimitar had two alternators on in its first year and has had two more
since. I can't repair them at the roadside and I have to disconnect the
battery to recharge it. My neighbour did this on his nearly new Rover, the radio
lost its memory and he had to send details to the works; 6 weeks later he got
the code!
I bought a new Daihatsu for my wife; it did 34 miles before conking out!
The dealers analyser indicated a faulty key, they tried the other two with the
same result. 4 days and 3 experts later they phoned Japan. It was a loose
earthing wire under the EFI, visible only with a mirror, and half the
ancillaries had to come off for access. Later she left the headlights on one
foggy day; the handbook says not to push or tow start the car (manual gearbox),
so it had to be towed home in any case. The 3 experts gave me 3 different
answers as to whether or not I could charge the battery without disconnecting
it.
(I have never had any problems recharging
batteries on cars fitted with alternators, electronic gismos or whatever, and I
can't see why there should be any problem, as the much more severe process of
jump starting is the norm in the supermarket car park. Push or tow starting is
another matter - I believe it is to do with protecting the catalyst; perhaps
readers can elucidate, although in Barrys case the battery would not operate
the fuel pump Ed)
If I could solve the earthing rotor arm problem and find some suitable
rear shockers, with a single bolt top fixing, to cure the curved spring and
sticking shocker problem I would be happy with my oldfashioned Olympic. (See
Les Browns letter on rear suspension. Also, wedges above the spring mounts
can straighten the springs usefully different on each side of course. Ed)
Disconnected Jottings
1. In my
last letter I said that unleaded could be as low as 84 octane. Of course I
should have said LRP.
2.
A small hair dryer (£2.50 in charity shop or £5-ish in Boots) can
be used to blow upwards to stop paint runs, it dries GRP or paint quickly, but
most of all to put inside your boiler suit for instant warmth or to ease your
aching back! (Could do with a cartoon here, Paul Ed)
3. If you
want harder or softer front suspension on your Phase 1 did you know the Minor
1000 had thicker torsion bars and softer shockers than Riley 1.5/ Wolseley
1500?
4.
Blow all the gas out of your empty penetrating oil can, pierce
the top with a sharp point, pour out up to a tablespoonful of oil and in winter
brush it on to your chrome and ali. It dries leaving a hardish greasy film to
protect from salt.
5. A double
bed mattress cover with elasticated rim nicely covers the roof and glass area
of an Olympic.
From Les Brown Olympic Phase 2
Hi Alan,
It seems like everyone else has had a go at this, so why
shouldn't I add my own two pennyworth?
PHASE 2 REAR SUSPENSION
Practice versus Theory
Fast, civilised, astonishingly quiet, predictable,
smooth-riding reading those old test reports, were they really talking about
the same thing? The rear suspension of my Phase 2 has been by far its worst
characteristic in recent times. When I first drove the car I found it
incredibly harsh and speaking with my cars original owner hadn't provided any
solutions. Had it always been like that? Dave wouldn't commit himself
perhaps he was afraid I would ask for my money back and tended to hide behind
vague generalities well, you expect a sports car to be hard. My first
inclination, to run it on the Michelin ZXs it stood on, proved to be a mistake
as they had hardened over the years and lost the smooth-riding characteristics
I had once admired. Replacement of all four, apparently little-worn tyres
provided some respite as did lowering the pressures a little I now run at
20psi all round, which would be much too low for some but the Olympic is such a
light car. Were official pressures ever quoted? Earlier experiences of 1960s
cars had not led me to expect this, and I had recently owned Minis, Coopers,
and various specials which had all been maligned for a choppy ride even in
their day, but actually rode much better than the highly-praised Olympic. And
if you were to compare my daughters (hydrolastic) Riley Kestrel, or even my
current Commer (Aeon spring assisters excellent) there really was no
comparison. Clearly something peculiar was happening, but what?
After putting up with things for some time there was lots
of other stuff to sort out things came to a head four years ago when the car
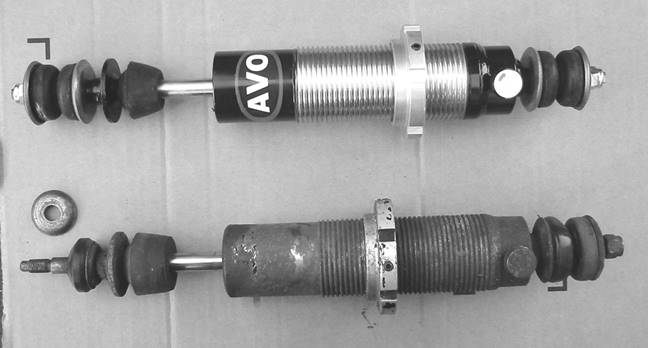
failed its MOT on leaky shockers. I resolved to go the whole hog and fit the
latest AVOs not easy since they wouldn't fit into the hole in the top of my
(1964) arms. After much cutting and welding, they were persuaded into place
but the results were disappointing. Could it be the bushes? I replaced the
lot, following conventional wisdom and fitting the poly variety where
available, but again with disappointing results. In spite of fairly soft (130
lb) springs, the rear end felt really harsh on the move, and speed bumps came
through with an almighty CRASH that shook both car and occupants. Leaning on
the rear, the movement was good several club members made the comment but
it was apparent that there was stiction I seem to remember my old Physics
teacher banging on about there being no such word, but I think most folks will
know what I mean - in the system which was preventing things from working as
they should. The problem was much eased when the car was loaded should have
told me something and a further indication would often occur as I lowered the
car after jacking it would often stay at the fully extended position for some
time, eventually settling into its normal ride height with a loud crash. The
slightest downward pressure was often enough to achieve the same thing, but the
weight of the car alone was clearly struggling to overcome the friction
somewhere. I know that not all Olympics are afflicted in this manner, but on
the other hand there are others too hard for comfort.
Again I put up with things for some time, but after being
off the road for a week or two while I fitted a new clutch and attended to
various Ford bits another crash came as the car was pushed onto the floor a
rear spring had broken. Worse still, when dismantled I found that it had been broken
near the top for some time, with a new break a few inches down. Also, the
shocker was found to be completely shot after a mileage of only about 14 000
miles. Time for some serious thinking. In spite of rubbish service from the
AVOs, I couldn't think the problem lay with them. Similarly, I know that SPAX
is almost a dirty word in Rochdale circles, but they used to work perfectly on
the various specials I have been involved with in the past.
Were the original Woodheads that the cars were tested on of
much more flimsy construction that these later items? Was flexing of the
damper rod absorbing certain misalignments which more heavily constructed
shockers did not? Were the original mounting rubbers more flexible than the
later poly bushes, and again absorbing some of those misalignments? Were the
different experiences from car to car a function of some rear ends being in
better alignment than others? Was the double ended stem arrangement on the
Olympic unsuitable for the application? Did the unusual spring location,
straight onto the body, instead of on a collar on the shocker, result in extra
vibrations being fed straight into the body?
Most owners will be aware of the odd angles which the rear
shocker sits in relation to both top and bottom mounting. This is quite a
complex issue, but how serious is the misalignment, and has it any effect on
the ride? With the shock absorber in place this is hard to judge, but when it
and the spring are removed, an interesting possibility is available. I have
always kept a small circular mirror in the garage for viewing timing marks etc,
and this was placed directly on the lower spring seating within the rear arm
and held in place with dum dum make sure to press it fully down onto the
seating. Next, place a light above the top mounting hole and Presto! the
mirror gives a circular reflection onto the underside of the car. If the
mounting holes are perfectly aligned, the image from the mirror will be
reflected straight back to the top mounting point. If not, the amount of error
involved gives an indication of just how far out things are. I was amazed at
how easy this proved to be, expecting to have to shine a torch directly at the
mirror, but this proved to be unnecessary moving the lamp about above the top
hole had little effect on the position of the image. Pick the centre point of
the reflection, and remember that the image is being reflected through twice
the actual angle of misalignment refer back to your O level physics if in
doubt! The extended length of the shock absorber is in the region of 370mm,
and the actual angle by which the shocker is misaligned is given by
Arc
Sin (Error/2x370)
Actual values are given in the table if you can't be
bothered getting the calculator out.

It is quite instructive to move the axle up and down and
watch the way that the image moves. On mine, the angles proved to be way out
at the fully extended position a good five inches or so to the rear and
slightly to the centre of the car. As the axle moved up, this quickly improved
until at the full bump position things were just about spot on. The
calculations refer to the fully extended position only, and should use the
compressed lengths if you want more accuracy across the range my own car gave
a reading of 11.7 degrees out at the bottom. Was this too much for the bottom
stem mounting? If you wish to do the same for the top point, you will need to
stick the mirror firmly in place on the underside of the top spring mount
(conveniently circular to allow you to position this) and shine the light
upwards through the bottom hole instead. I found it convenient to tape a piece
of card to the top of the arm to catch these reflections, with a hole cut
directly above the bottom hole to allow the light to pass. Results here were
much more encouraging, with an initial error of only 30mm or so, representing
an angle of about 2.9 degrees or so (note that the length from mirror to image
is a bit smaller here, if you use the card. I thought this was pretty good and
unlikely to cause problems, although the error got steadily worse as the
suspension was compressed the opposite of what happened at the bottom.
Overall, the misalignment problems seemed to be worst at
the bottom of the travel, therefore the worst place, if you think about it.
With the arm at its lowest position, the 12 inch spring was compressed to 10.6
inches, giving a force of only 182 lbs on my 130lb springs. At full
compression, where things were almost perfect at the bottom, a 7.1 inch length
gives 637 lbs which would be enough to overcome any stiction if present but
the figures for the extended spring obviously weren't doing this.
All very interesting, but what to do about it? Talks with
Nigel top marks for speedy delivery of the next set of AVOs and Alan
brought up a couple of further points. Firstly, fasten the shockers in place
without springs and see if there is excessive friction. The answer here was,
yes there was, at just the point that the above would indicate I could hardly
move the darned thing at all, and the axle weight was nowhere near enough to
overcome the friction forces caused by the side loadings within the shock
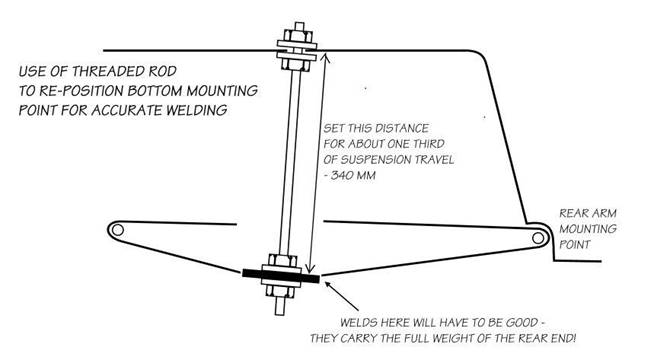
absorbers. I have toyed with re-welding the base of the suspension point to
achieve more appropriate geometry for some time, and the scheme shown would
seem to offer a fairly straightforward procedure. Cut away the bottom of the
arm, make up a replacement base and hold it in position at a better angle using
a threaded bar through the top point. I haven't actually done this one (out of
Oxygen at present) but it's an interesting possibility do be sure of the
welding at this point, however, as it is vital to be as strong as possible to
carry the back end of the car.
As a temporary measure, it seemed sensible to lower the car
a little to get away from the bottom, fully extended position as far as
possible I wound the spring collar down half an inch or so and crossed my
fingers. The other suggestion was yours, Alan don't tighten the nuts at the
ends of the shock absorbers any more than necessary. I therefore replaced the
poly bushes at both top and bottom with the larger, softer rubber items which
came with the AVOs, using Nylocs and Loctite, but kept the tightening to an absolute
minimum to allow as much flexibility as possible. A point to watch here is the
size of these rubbers and the whacking great washers they come with. If you
fit these directly to the top points, you are likely to end up with the top
washer rubbing on the three nuts that hold the top plate in place the way
that the shocker angles are changing resulted in extremely loud chirruping
noises which took quite some tracing! This was fixed by filing the washers to
avoid contact with the nuts.
And now the $64000 question did it work? After four or
five years maybe even longer of boneshaking ride the answer is basically
yes. There is no comparison with the current ride quality with that of a few
weeks ago, all the more surprising for being such simple tweaks. I now have
some idea for the first time what those tests were talking about presumably
RMP made sure the testers got a good one, but then who wouldn't? After a few
days on the road the ride is really quite good, especially when the sporting
pretensions are considered. Now why did it take me so long to get round to
it? I am now intending using castellated nuts and drilling the stems for split
pins to enable the nuts to be kept at minimum tightness in safety thanks
folks, I'm a happy bunny!
POSTSCRIPT: Since carrying out the above, I thought that a
call to AVO themselves might not be a bad idea. Shame I hadn't thought of this
earlier! I ended up with (another) Nigel on the line who proved both
interested in the problems encountered and also very helpful. He confirmed
that the stem-stem arrangement was not good, and could only think of one other
car the Marcos which used this layout. He said that this car was also
plagued with similar problems, and felt that the arrangement would inevitably
lead to misalignment issues. He seemed to approve the slack-as-possible
approach for the mounting nuts, and felt the castellated nuts and split pins to
be worth a try in the circumstances. He also didn't like the mounting of my
spring right up to the bodywork with a smaller diameter 2.25 inch diameter
spring a larger diameter spring would be needed in order to avoid bowing,
which was presumably part of the reason why mine had failed. Now where did I
put those original springs.? He recommended a shorter spring mounted
conventionally onto the shock absorber via a top collar I now have four of
these kicking around!
Other suggestions were to replace the bottom mounting
altogether with a rose jointed fitting to cope better with the alignment
problem. I had visions of the s mounting up at this point but he said
conversion was not a big issue if the shocks were returned about 10 apiece,
plus about a fiver for the joints. Failing that, just changing to a
conventional eye fitting with rubber bush would probably do the job anyway. He
was keen to look at my scrapped shocker to see if it really WAS side loadings
that had done the damage - this seemed a good idea, but like a pratt I had
already thrown it, only saving the nearside item which was in much better
shape. Last point concerned the strength of the shockers I mentioned that I
was running mine on position 3 (of 22 available) and he felt that this
indicated that further reduction of the damping forces would be beneficial,
especially as the spring was of only 130 lbs strength. This could be easily
done if they were returned, though I'm not sure that this was included in the
above price.
Following this, I've been looking for some actual figures
on the present AVOs. I have only some details from a photocopy of mag 64, but
no figures and Nigel couldn't find any details on his computer he thought
that the firm had moved and changed hands since they did ours. I have a copy
of original Woodhead diagrams, with handwritten details added ie rebound 230
lbs, compression 106 lbs. Does this sound about right? I think I have seen
132lbs quoted for the original rear springs also. I'm on my third set of
springs (and shockers!) so I'm a little reluctant to take the plunge on a
fourth especially with the improved ride but it would be nice to get right to
the bottom of all this!
LBB
Footnote from Alan: I can't see why the
stem-stem arrangement should be a problem indeed it is the only one which
gives compliance in both planes at both ends if you don't overtighten the
nuts (shades of Phase 1 doughnuts?). The bottom rubber is only ever compressed
on rebound. Re using the AVO top mounts: this would probably require shorter
springs, and you would have to ensure they did not become coil-bound on full
bump. Finally, my arms did not allow the retention of the AVO adjusters, so I
removed them, cut down the shaft and sawed a screwdriver slot in the end. The
annular space was filled with grease-impregnated foam and they are the only
part of the shocker that has not rusted! Nul points to AVO for rustproofing.
- From
Aubrey Richardson Phase 1
Dear Alan,
As mentioned at the AGM, at very long last I have managed to obtain a
Rochdale Olympic! I purchased a complete and remarkably original Olympic Phase
1, registration number FEA 458D from Derek Johnson of Crowthorne, Berkshire on
Thursday, 3rd March, 2005. According to the log book (a V5 amazingly) the car
was first registered on 4th July, 1966 and holds the chassis no. 35045
(confirmed) and the engine number 15WC-U-W662 (unconfirmed). On first glance
the engine does appear to be a Riley 1.5 'B' series. The block certainly has
'1500' cast into the side. Derek also supplied an HRG alloy head and various
other spares.
The V5 does not indicate the number of previous owners, but
what little history Derek could supply is detailed below:
Car acquired in "early 70's" by Derek from a man (possibly a
student) living in a YMCA or similar in London. The car has standard Riley
suspension with an MGA close-ratio box. Apart from an erratic idle (cured by
replacing carburettors) the car was reliable until involved in a rear-end
collision courtesy of a Mercedes. The car was taken off the road at this time
and has remained dry-stored ever since. The date of the accident is now not
known, but the newspapers under the car indicate somewhere around April 1977
(indeed they heralded the Royal Silver Jubilee!) and the tax disc ran out in
early 1978.
The damage to the rear of the car remains, mostly around the number plate
and rear lights (the fibreglass complete but broken), as do sundry damages to
headlight, scratches to wings, roof and a few stresscracks. The door hinges
are broken and the car is in need of full restoration, which I intend to do
over the coming year(s)! I've restored several Lotuses so are not too
unfamiliar with fibreglass repairs. Malcolm will be pleased to know I intend
to fit a 27 litre Rolls-Royce Merlin and the suspension and steering from a
McLaren MP14 I happen to have lying around (only joking, it's a Griffon not a
Merlin...).
Since writing the above to Derek B I have started on the car. I intend
to repair the rear-end damage first, remove the mechanicals, completely
renovate the body and respray it, check/renovate the mechanics, wiring,
seats/trim and then simply reassemble everything (in true Haynes manual
fashion). So, I should be able to bring it to the Capesthorne weekend (in
2030).
The brunt of the impact with the Mercedes was taken fairly squarely
around the number plate region. Indeed, I'd say the reversing/number plate
light was the centre of the impact. According to Derek Johnson, he was sat
stationary at a junction when the Mercedes became too familiar, so I suppose
the impact speed was not too high. The damage is limited to an elliptical area
centred on the number plate, extending to within 75mm of the rear window, to
30mm or so around each side of the number plate and rather more extensively
under the rear valance. I presume the Olympic rode up the bumper/bonnet of the
Mercedes. The body just above the centre of each rear wheel arch is cracked
and I can't quite make up my mind if this was caused by the impact shock
flexing the fibreglass beyond its elastic limit, or by the rear wheels rubbing
the wheel arch. Initially I thought a rear number plate repair panel would be
required, but having spoken to Roger Coupe at the AGM and having seen the
photographs of his rebuilt Riviera, I have adopted his 'fishplate' repair
method (small strips of metal, one end screwed to the sound fibreglass and the
other to the fractured piece, the back side of the panel is glassed and then
the face attacked). So far so good! (Indeed, repairs to this area are now
complete).
Inevitably, on closer inspection the rest of the body shows more signs of
damage than I originally noticed, especially star cracks and ding damage -
thankfully no osmosis (perhaps it is just a Lotus thing as all my 'Loti' have
osmosis somewhere). The roof appears to have had something dropped on it
(suspiciously body shaped - Derek seemed such a mild mannered man.) and the
driver's door outer skin has separated from the inner where Neanderthal
techniques have been practised whilst attempting to open the door (not by me, I
hasten to add!). The door lock has been ripped off and the door skin damaged.
The driver's door window frame was broken just above the triangular
reinforcing piece at the bottom front of the frame, but I have just welded this
up and polished it. Luckily no distortion and after a few hours filing and
polishing the repair is now invisible.
Having read through many of the back issues of the Magazine it appears
the following is not uncommon: Door hinges! At the moment, the doors are
seemingly held onto the body via structural cobwebs - unlikely to pass an MOT.
Just how are you supposed to get to the hinge pins? They remind me of the Lotus
Elite/Eclat/Excel's wiper motor, which is reputed to have been hung from the
ceiling and then the rest of the car built around it! (Ah! Richard Parker went
on to Lotus.). Perusing the back issues of the ROC magazine, I was quite taken
with your solution using spherical bearings. However, I still need to remove
the doors so if you have any tips for doing so without recourse to Anglo-Saxon
diatribes, a keyhole surgeon or strange practices involving black cockerels, a
full moon and ancient chants (tried them all) I'd be grateful.
The front of the car has a few scrapes, dings and such like
which I suspect is a result of hanger rash. The most serious damage is a broken
bonnet hinge and a broken headlight.
Whoever built the car must have been hardy, as there is no heater
fitted. Indeed, at the AGM the first thing I noticed was the air inlet duct in
front of the windscreen on all the cars present. FEA 458D has a single
windscreen washer jet instead. Perhaps heat soak makes the use of a heater
superfluous? If so, perhaps air conditioning may be a necessity.
The engine is in need of TLC and at least one core plug has been evicted.
Whilst a standard B series (Wolseley according to Derek Bentley) is fitted,
Derek Johnson also included an HRG head and two new rear shock absorbers in the
sale. I'm undecided on what to do with the engine as part of me wishes to keep
it quite original, (and the HRG head is quite good) whilst another is horrified
by the weight of the B-Series (it allegedly attracts planets). I'm also under
no illusion about my abilities to toe-and-heel perfect gear changes every time
on the synchromesh less gearbox - close ratio or not. I do have a Lotus
Twincam and Coventry Climax (FWE) awaiting new homes, but no gearboxes.
Decisions, decisions. I am also deliberating over whether to fit an engine
management system; I must be in the minority as I find ECU's and modern engine
management very straight forward, but I still haven't quite got my head around
the Weber carburettor.
Under the bonnet I was pleasantly surprised to see the sub frame was
quite sound (most of the engine bay was liberally coated with oil and grease).
Ron Scarfe suggested jacking under the sub frame to see if it is actually okay,
which I haven't done yet. I've yet to measure castor, camber, toe and
all-round alignment, but as I believe this Saturday should be a fine day I'll
use it as an excuse to evade gardening duty.
As for the rest of the car, the electrics will be
educational as the wiring appears to be original (I may donate the loom to a
local museum) and the interior is complete but in need of recovering.
No doubt this all sounds horribly familiar to you (and
probably anyone else reading this) but I've waited so long for an Olympic that
I'll overlook the odd blemish.
Finally, having read many back issues of the magazine I
just wished to express my admiration for your work as Editor. The magazine is
always very informative and engaging; very impressive!
Regards,
Aubrey Richardson
Dear Aubrey,
Thanks for the details of your purchase. You seem to have a fair bit of
work ahead - what's new? Although the car was taken off the road due to its
rear ender it seems to have a lot of other damage. I guess the damage to the
driver's door arose through the problems with the hinges, apart from the
separation of the skins, which is normal Olympic. The doors seem to be just a
weeny bit too big for their openings, so when the edges get ground off ....
Hinges: the lower can be accessed though the inner panel, which usually
has had a large hole cut in it for the very purpose (the Phase 2 has no inner
panel), but the upper is a lot more difficult. I think the easiest way, and
probably the best if the hinge is rusted solid, is to cut an access hole
through the outer skin. If you keep the cutout it can easily be grafted back
in, whereas trying to work in a narrow black hole through the bonnet opening is
a nightmare. Two Club members have had success with the rod end method and
both said it was not difficult (I did mine when there was no dashboard in place
and the shell was on its side, so it was particularly straightforward for me).
Getting the doors off the hinges can also be tricky if the bolts are
rusted up (they usually are). I can't remember in detail how I did my Phase 1
but it involved a vet-like insertion of the arm. If the hinges are really bad
it may be best to cut them off and start with new, but the rod end method is very
tolerant to wear of the bores, so it would be worth trying to cut/grind off the
bolt heads first, if the nuts cannot be removed by a civilized method. The
other advantage of my method is that hinge misalignment is unimportant -
usually a major cause of trouble in the original.
Engine: the W in the engine number shows it to be Wolseley and another
indicator is the lack of a mechanical take-off for the tacho at the rear end of
the camshaft. Choice of engine/gearbox is yours! I must say my Olympic did
feel a bit heavy with the B series motor.
Do I gather you are au fait with ECUs and injection? If so I could do
with some steer on my current Olympic project which has a Ford Zetec 2l motor
(don't tell Malcolm). I have the original EFI system including the ECU and
probably all the loom too. I can't fit in the original fuel injection
hardware, so I was planning to use a pair of DellOrtos that I have pro tem.
The question is: will it run with the original ECU in ignition-only mode, or
will I need to use an aftermarket system? I would convert to EFI later. Your
comments would be appreciated.
I am redesigning my wiring based on a Fiesta IV fuse/relay
box. The diagram for this makes the original Riley diagram look like a minor
accessory!
My Phase 1 was never fitted with a heater - the original owner said one
wasn't available when he built the car (1961), and sold it because of this
after the bitter winter of 1962/3, but the factory offered one from early on,
so he must have been misinformed. It has a washer jet in the same place as
yours. I fitted a Mini heater in the space above the passenger's feet, fed by
a hose from the front. The driver has his own, cold only, feed via a hose from
the front. Unless you intend to do a lot of winter driving, I reckon cold air
is more important than hot. You are right - there can be a lot of heat from
the exhaust, and it is worth insulating the glassfibre from this to prevent damage
to the footwell by the manifold.
There are probably a lot more things to mention, but enough
for now!
Regards, Alan
PS Thanks for the bouquet (I actually quite enjoy the
editor's job as I get to keep in touch with what's going on).
100E INTO FORD TEN DOES GO
With regards to engines 100E into Ford Ten does go but with a bit of
skill and ingenuity. It also helps if you have pulled a few Ford Ten, 100E and
Kent Cortina engines apart and have a few extra parts sitting around.
The bottom end of Ford Ten and 100E engines could be classed as quite
robust. They will last but they need oil pressure to do so. I lost two sets of
cranks and bearings before I solved my problem. The save (Oil Pump OPTION
FOUR) came at a high cost, but so are bearings and cranks. My 100E engine
runs with 50 pounds of oil where it goes into the block at the rear of the
engine and can run to 5,800 RPM. My Ford Ten engine runs with 40 pounds at the
front of the engine and the oil enters at the rear by using a 100E side plate.
You open up the oil pressure switch hole in the 100E side plate and re-tap it.
It goes from 1/8th Gas to Gas. The Ford Ten engine is happy up to
5,300 RPM. Both engines have been balanced.
Oil pressures. The external oil pump Ford Ten engine oil pressure was
disappointing at first but I eventually worked out the differences in the
engines. With the 100E engine the oil pressure is taken from the fitting where
the oil goes back into the engine and that engine runs 50 pounds. The Ford Ten
engine pressure is taken from the front of the engine where the oil is picked
up for the bypass filter. The pressure indicated is the oil pressure at the
front camshaft bearing and at 40 pounds there, it is quite acceptable. I
suspect that there would be a pressure drop from the rear to the front of the
engine in both cases but I
have never proved it.
SUMP. A good place to start because that's where
all the work is and if you cannot get that right do not bother. You need to
have an old 100E block and a Ford Ten gearbox to make sure you weld the sump
square and without warpage. Cut both the Ford Ten and the 100E sumps off 1"
from the block flange. Bolt the 100E sump flange to the 100E block. The 100E
block bolts match the Ford Ten gearbox bolts so bolt the Ford Ten gearbox
casing to the 100E block. The 100E sump, 100E gearbox bolt pattern is
different to the Ford Ten but this is not a problem as you then bolt the base
of the Ford Ten sump to the Ford Ten gearbox case and those bolts line up. Weld
the two sumps together. Some sheet steel will have to be used to fill gaps in
the front section. When all the welding is finished do not forget to re-solder
the area around the flywheel. You will see where the solder flows out when
cutting and welding. When that is done fill the sump with kerosene to check
for leaks. Re-weld and re-solder as required.
The 100E engine is quite civilized and has its dipstick on
the RHS of the engine out or the way of the inlet and exhaust manifolds. On the
Ford Ten the dipstick tube and dipstick get in the way of inlet and exhaust
manifold changes. This can be fixed by welding a dipstick tube into the Ford
Ten sump on the RHS making sure it clears the engine steady rod on that side.
You then have to make a dipstick of the required dimension. Before the sump
is leak tested fit the oil pump and modified pickup to a 100E block with crank,
rods and flywheel and test fit the sump. The Ford Ten sump has a dimple in the
lower section that interferes with the flywheel. Use a bit of hammer and/or
heat to solve that problem. Make sure the crank turns without hitting
anything. Make sure the dipstick fits also. I used a cut down Cortina Mk 1
dipstick with a cap that covers the hole in the 100E dipstick tube. The cap
was brazed on in the right place for the oil level required. Due to clearance
problems fit the studs for the engine steady rod brackets after the sump is in
place.
OIL PUMP OPTION ONE. Use the Ford Ten oil pump, which sits on the
LHS of the sump. Not a really good idea because of oil pressure problems
turning left. Can be solved to a degree by putting a vertical north-south
baffle in the centre of the deep part of the sump with a one-way trap door 1"
square to stop all the oil rushing away from the pump in LH turns.
OIL PUMP OPTION TWO. Use the 100E oil pump, which
sits on the LHS of the sump with the oil pump pickup entry pointing forwards.
Use some copper pipe and right angle elbows to take the pickup forward to just
in front of the No 1 crank, across to the other side, back to the gap between
cranks No 3 and No 4, into the centre of the motor, then down into the centre
of the deep bit of the sump.
For a baffle this time use a flat sheet of steel level with
the floor of sump just below crank throw level. Cut a hole for the oil pickup
to go through. Do not forget a hole also for the dipstick. Bracket the RHS
oil line to the centre bearing crankshaft web. Drill and tap the crankshaft
web.
OIL PUMP OPTION THREE. The 100E oil pump is biased
to the centre of the engine. When it is turned through 180 degrees it is now
biased to the outside of the engine, will no longer fit in the sump and the oil
pump pickup is pointing in the right direction. You then cut the bottom of the
deep part of the sump out, and also the side of the sump adjacent to the oil
pump. For option 3 do not weld that bit of the sump up. You then deepen the
sump by 1" and this has the bottom of the sump level with the front axle
radius rods when the engine is fitted in the vehicle. By using the 100E oil
pickups you should by using the cut and weld method get the oil pickup in the
right place, centre bottom of the deep part. You then build up the sump around
the oil pump. I used a flat piece of sheet steel for the base of the sump and
fitted a sump plug in the base. In the long term this does not work. The flat
sheet flexes up and down due to the hot and cold cycles and cracks through the
welds. I removed the flat sheet and used the bottom of a Mk 1 Cortina sump with
the sump plug left in place. The base of this sump section can go down level
with the bottom of the radius rods for a useful increase in oil capacity in the
sump. I put a horizontal baffle in the deep part of the sump just below
crankshaft throw level and stepped under the oil pump. This baffle had a
circular hole for the oil pickup to go through and another for the dipstick.
OIL PUMP OPTION FOUR. An external oil pump. Some racing cars have
dry sump oil pump systems. They normally have sandwiched together one pump to
put oil under pressure into the engine and two or more pumps to get the oil out
of the sump. A local firm made up a pump for me with just one section. As you
can see in the photo it is made up of aluminium/duralumin? plates held together
by four through bolts, one in each corner. The plates are very smooth/flat and
fit together without oil loss, without sealant, just a skim of oil. The
internally toothed belt is driven from the nose of the crankshaft. The pump
drives at half engine speed. The front face of the generator drive pulley was
trued up in a lathe so that the toothed belt pulley would run true. The front
plate that you can see is part of a leg that goes down to the engine mounting
bar and is bolted to the engine mounting bar. The externally adjustable
internal pressure relief valve vents back into the inlet pipe.
The 100E engine has a sump made for fitment into a Ford Ten chassis. It
has been deepened by about 30 mm and has the oil pickup terminating on the LHS
of the sump from the centre of the deep part of the sump. The Ford Ten engine
has a sump deepened in the same way with the same type of oil pickup. I have
used proprietary barbs for the hose to fit on and proper spanner tightened
joining pieces. There are no worm drive hose clamps. The oil comes out of the
sump and into the bottom of the pump with the use of 5/8-inch internal oil
hose. It comes out of the pump through inch internal oil hose and through a
full flow oil filter.
The filter element (Z62) is the same as that used on a spin on oil
pump/filter as used on the Ford Kent engine. Both the 100E engine and the Ford
Ten engine are fitted with 100E side plates and the oil goes back into the oil
gallery through an opened up and re-tapped oil pressure switch hole. It goes
from 1/8th Gas to Gas. There is a blanking plate over the hole
where the original oil pump was fitted. The camshaft lobes have been reground
to the same figures (for both engines and the Ford Ten inlet and exhaust ports
have been opened up to 100E sizes) and the camshaft bearing surfaces all ground
to the same size. Both engine blocks have been fitted with semi finished
camshaft bearings line bored to suit the camshafts.
If you are having machine work done on your 100E block have
the welsh plug holes opened up to 1 11/16". There are brass welsh plugs
readily available in that size. 100E ones are 1 43/64" and hard to get.
Options one, two, three and four can also be used for Ford
Ten engines to solve the no oil pressure when turning left phenomenon.
100E BYPASS FILTER. The 100E bypass oil filter interferes with the
LHS engine steady rod and the front axle. The 100E water pump interferes with
the Ford Ten front timing cover. Fit the 100E water pump and then file the
Ford Ten front timing cover to fit. Fit the Ford Ten side timing cover.
Loctite some form of 5/16" bolt into the left over hole.
The Ford Ten front support bar can then be used to support the front of
the engine in the normal manner. The other two holes by the timing cover are
holes for the bypass filter utilized in options one, two and three. The oil
comes out of the top hole and returns via the lower hole. These holes should
already be threaded and take Ford Ten block fittings. Put an oil restriction
hole in the lower fitting. Solder it up and drill it 0.5mm. An off-road after
market source supplied a remote spin-on filter and base. The local brass tube
fitting source supplied the connections to use 3/16" OD nylon tube. I fitted
the oil filter on the LH chassis rail in front of the radiator.
ENGINE STEADY RODS. Use the Ford Ten engine brackets but they
will have to be shortened and re-drilled to fit. I put studs in the rear two
holes either side of the sump to fit the brackets. The engine steady rods are
then too short so I cut up 4 rods so that there was only one weld in each rod.
RADIATOR. I used the Ford Ten radiator. The bottom outlet was
moved to the right as far as possible. I actually put a cut in the outlet tube
from the LHS just short of cutting it right through, bent it outwards and then
filled in the V. I used a shortened lower 100E radiator hose. I only had 100E
engines with molded top radiator hoses so I did the following. The only block
outlet that I could find with the right bolt spacing was from a Hillman Hunter
and that took a 1" hose. A flexible hose was used as a top hose. If you have
the metal 100E thermostat housing that may match the top Ford Ten radiator
outlet and you can use a larger flexible hose. As a thermostat is used the
over capacity of the Ford Ten radiator is not a problem. If you wish to use
the 100E radiator you will have to make up some mounting brackets for it. I
fitted an O-ring to the brass Ford Ten radiator cap to make an airtight seal.
When the coolant gets hot it expands into an overflow bottle and when it cools
and contracts it gets sucked back into the radiator.
STARTER MOTOR DRIVE. The 100E bendix drive interferes with the
gearbox casing. Cut off the gearbox casing in that area so it will fit. Make
sure that you leave all the bolt and dowel holes in place. The gearbox floor
hump will have to be re-modeled with a hammer to make room for the bendix
drive. Unless you live, drive, in a very dusty area no other covering is
really necessary.
As the 100E starter motor needs 12 volts I converted to 12 volts negative
earth. I used a Bosch-Motorcraft 12 volt internally regulated alternator. The
engine bracket was made from 1" steel strip, it needs to be strong. I
broke a lot of adjustment brackets, they need to be strong as well. I had a 3
brush generator with cutout so it was easy to wire it in. The ammeter wires
had to be reversed. I used a 12 volt windscreen wiper motor and fuel pump. The
fuel gauge works on 12 volts but will not last. Use a 7 volt resistor as used
with 7 volt coils in a 12 volt vehicle. I fitted an oil pressure gauge (60lb)
and an oil pressure warning light. I was able to buy suitable 12 volt
headlight globes and fitted a high beam warning light.
SPIGOT BEARING AND CLUTCH. The 100E spigot bearing matches the
Ford Ten one for size. You can use either the bronze bush or a later model
sealed bearing. Use a 100E clutch plate as the spring centre is kinder on the
crown wheel and pinion.
DISTRIBUTOR. As I wanted modern push fit spark plug leads I
fitted a modified Lucas Mk 1 Cortina distributor. You cut all the vacuum
advance housing off and fill the hole with silastic or these days, two part
epoxy filling. You rivet the top moving plate of the distributor to the fixed
plate in the static position. You remove the Cortina drive gear and after
re-drilling the shaft fit the 100E drive dog. The holes are close together and
parallel. Make sure the rotor button is in the right place before you pin the drive
dog. The 100E holding adjustment bracket fits the Cortina Distributor.
CARBURATION. I started out with twin 1" SU's and an Aquaplane
exhaust manifold. As I could not get the needles right for the SU's and as
access to the carbies was difficult at best they eventually went. The next
try was an alloy adapter block on a 100E inlet manifold to fit a 28/36 DCD
Weber twin choke downdraft carby off a Mk 1 Cortina GT. It was re-choked and
re-jetted and worked pretty well. The primary choke is 18mm and the secondary
choke is 20mm. To tidy up the 100E inlet manifold I cut all the hot box section
off. The accelerator linkage was set up similar to a Mk 1 Cortina GT. The
Aquaplane exhaust manifold was used.
The next try in the Tourer was when I went back to the improved Ford Ten
engine. I have a ROWE twin carby inlet manifold. It was made in Adelaide where
I live. The carbies are single choke down draft Webers, 26 IMB 10's from a
Fiat 600 or some such. You can buy them brand new, they are well made lovely
carbies, and you need to have a bit of re-jetting experience to get them to
work. The Aquaplane exhaust manifold was retained. I had the Tourer parked
near my work station at one of the Adelaide Classic Rallies and Paul Vesty and
in particular Doug Nye were most impressed with the Tourer. I said that it had
twin Webers and Doug thinking twin double choke side drafts just had to look
under the bonnet. He was sucked you could say by someone not properly
identifying the Webers on purpose. He still asks after the Tourer.
I have a single 26 IMB 10 on my Tow Motor with Ford Ten
inlet manifold and an Aquaplane exhaust manifold and that engine purrs like a
watch as well. I had to make up an adaptor plate to fit the carby.
The carbies open up the wrong way so you have to show a bit
of initiative to get the butterflies to open. The choke cable needs to be extra
long as well as the cable enters from the front.
I fitted the 100E engine to my 1948 Anglia Sports Tourer as I wanted a
bit more performance. The other major reason was the slipper bearings, cheaper
and easier to rebuild. Some early 100E engines had poured metal bearings so
look out for them. The Bay to Birdwood Committee did not like the 100E engine
as it was too modern for their liking. I had to fit a Ford Ten engine just
before each B to B run. When the Rochdale GT came along I had some where better
to fit the external oil pumped 100E engine and an external oil pump Ford Ten
engine was built up for the Tourer.
With regard to the oil pump options I have done all four. My sedate
driver the 1938 Ford Ten sedan has option one. My past devil may care
driver the 1952 Anglia mudsprint sedan has option two and a large oil pressure
warning light as I did not really trust all that copper pipe. That engine now
gives good service in the Tow Motor. The sports tourer gets a bit of a stir
along and has had options three and four. The tourer runs 15" wheels and revs
a bit to get anywhere but has lots of oil to look after it. I live near the hills
and do not need to use second gear too often in the hills.
Later 2004. I have fitted a 100E crown wheel and pinion
into a Ford Ten diff housing. I now use less revs but need second gear more
often.
I used Renault R8 or R10 rims made up with Ford Ten centres. I use
Michelin 135 by 15 tyres which should come with the wheels. Try to get wheels
with double safety humps to hold the bead in place for when you get a flat
tyre.
Gordon Cowley
Originally prepared October 1989. Revised and
updated January 2002.
FBHVC NEWS
The recent issues of the Federation of British Historic
Vehicles Clubs (FBHVC) newsletter has contained many items on current or
proposed legislation that could affect the historic vehicle movement, much of
it originating from the EU. There is far too much to include in this magazine,
but if anyone wants more details than the brief outlines I have given below,
please contact me for a photocopy of the originals or, better still, log onto
their website: www.fbhvc.co.uk
Alan Farrer
Annual
Registration Charge
Proposals to impose an annual charge on vehicles whether on
the road or not, ie a tax on possession. This would impact particularly on
keepers of collections. Its purpose is to fund the vehicle register at the
DVLA.
Continuous
Enforcement of Motor Insurance Reuirements
Proposal to make it an offence to be the keeper of a motor
vehicle, the use of which was not covered by insurance. This means one would
need to insure a vehicle that was licensed, even if it was not being used (eg
under restoration, but licensed on the nil rate band).
Review of Number Plate Suppliers Regulations
that prevent the supply of number plates for 1973-2001 vehicles in their
original font.
Waste
Framework Directive (EU)
Proposed regulations to translate the agricultural waste
elements of this directive into UK law. This could prevent farmers (and
presumably others) from keeping obsolete machinery on their land.
Extension of
the Kent Act
Refers to the requirement for dealers to register with
local authorities and to keep a record of transactions. This could apply to
occasional autojumblers or organisers of jumble-type event. This originated in
Kent!
Volatile Organic Compounds
Refers to requirement to replicate the finishes on older
vehicles (cellulose etc).
Clean
Neighbourhoods
Guidelines aimed at improving the environments in which we
live. One of main items is nuisance parking, which aims to prevent the use
of the public highway to carry out repairs or trading in motor vehicles. Could
possibly prevent the use of a mobile mechanic on the road.
Driving
Licences
Relates to the renewal of licences at age 70. Unless
additional information is given at the time of renewal using form D1, and other
forms filled in, the new licence will cover only category B (basic licence).
This will be required every 3 years.
Weight restrictions for cat B, including 3500kg for total
combination weight. This could affect people towing cars on trailers using a
large 4x4.
MOT Testing
Computerisation of the testing procedures means that MOT
test stations will be monitored centrally; it appears that many station do not
currently implement the 24 hour re-test rule, that allows a free re-test of a
failed vehicle if it is taken away and returned within 24 hours, but allow more
time than this. Big Brother will ensure their compliance in future, so be
warned.

ROCHDALE OWNERS CLUB RULES
1.
Name
The name of
the club shall be 'Rochdale Owners Club', hereafter referred to as 'The Club'.
2.
Address
The address
of The Club shall be the address of the Secretary at the time.
3.
Objectives
a). To provide
Members with information, advice and assistance on all matters connected with
the marque Rochdale.
b). To
arrange meetings (eg lectures, social, competition) and so promote the
interests of The Club.
c). To
afford members such benefits and privileges as can from time to time be
arranged.
4.
Membership
Membership
shall be available to past and present owners of Rochdale cars, and also to
anyone claiming an interest in the marque. Membership shall be subject to
acceptance by the Committee at all times; such acceptance to be confirmed at
the AGM. Associate Membership will be available to a second person living at
the same address as a Member. One copy of the club magazine will be sent to
that address; each Associate member will be entitled to one vote at Club
meetings; to attend Club functions; to stand for election to Committee posts,
and generally be entitled to all other benefits of Club membership.
5.
Subscriptions
The
subscription rates shall be reassessed annually at the AGM and fixed for one
year. Subscriptions are currently due on the first of April each year.
6.
Finance
All monies of
The Club shall be handled and administered by the Treasurer. Payments shall be
made only on the signatures of the Treasurer and either the Secretary or the
Chairman. Payments over £35 shall be subject to prior approval by the
Committee.
7.
Officers
The Officers
of the Club shall be: Chairman; Secretary; Treasurer; Editor; Olympic
Registrar; Pre-Olympic Registrar. (Officers shall be fully paid up members of
The Club).
8.
Election of
Officers
Election of
The Club Officers shall be made annually at the AGM. Retiring Officers shall
be eligible for re-election. Nominations shall be received by the Secretary in
writing if before the AGM, or at the AGM. In either event, the proposer must
have received the consent of the nominee prior to the nomination.
9.
Committee
The Committee
shall consist of the Officers plus not more than four other members elected in
accordance with the rules given at eight above. Additionally, the Committee
shall also be empowered to co-opt other Club Members for specific purposes to
further the aims of The Club. Such co-opted Members shall have equal standing
to elected Committee Members, and be subject to the same termination.
10.
Minutes
It shall be
the responsibility of the Secretary to take Minutes of all Club meetings as is
appropriate. Such minutes to be entered into a book and presented for
confirmation.
11.
Voting
Voting at all
meetings shall be by show of hands or such ballot as may be determined at the
time. Every Member (including each Associate Member) shall be entitled to one
vote
(one
subscription is one membership).
12. AGM
The Annual
General Meeting shall normally be held during the month of April each year for
the following business:
a) to receive the reports of the
Committee for the past year;
b) to receive and consider the statement
of accounts for the previous year, as audited;
c) to appoint an auditor;
d) to complete any other business
appropriate to an Annual General Meeting;
13.
Special
General Meeting
A Special
General Meeting may be called at any time by the unanimous decision of the
Committee, or by not less than 10% of the Members. The reason for the SGM
shall be given to the Secretary in writing, and a minimum of 1 month's notice
to members will be required.
14.
Alteration of
Rules
These Rules
are subject to the wishes of The Club Members, and may be modified in part or
in whole by two-thirds majority vote at an Annual General Meeting; or a Special
General Meeting called solely for that purpose.
15.
Allocation of
Rules
All members
shall be provided with a copy of the Rules on election, and whenever there is a
substantial change to them.
16.
Use of
Computer
Members
should note that Membership details of members and their cars are held on
computer.
T O P T W E N T Y O I L FAQ s
Top Ten Frequently Asked Gear Oil
Questions
1.
What does API GL mean?
API stands for American Petroleum Industry and GL stands
for Gear Lubricant, see below for their definitions:
API GL-1 Straight
mineral oil
API GL-2 Mild
EP for worm gears
API
GL-3 Mild EP for spur and spiral bevel gears in axles and
transmissions API GL-4 Medium EP, MIL-L-2105 quality, moderate
severity hypoid gears, manual transmissions
API
GL-5 High EP, MIL-L-2105D quality, all hypoid axles, some manual
transmissions API GL-6 Extra high EP, now obsolete
2.
Is it important to select the right API GL rating?
Yes. Selecting the correct gear oil performance level will
provide the best protection to the components of the transmission.
3.
What do the SAE grades mean?
SAE stands for the Society of Automotive Engineers. The
SAE classification system is a way of defining how thin or how thick an oil
is. This is known as an oils viscosity. The classifications are listed here
in order of increasing thickness: SAE 75W, SAE 80W, SAE 85W, SAE 90, SAE 140,
SAE 250.
4.
What does EP mean?
EP means extreme pressure and refers to the additive used
in gear oils. This additive is designed to stop metal-to-metal contact taking
place between transmission components. The EP additives are usually based on
sulphur and phosphorous. These elements bond to the metal surfaces where there
are points of extreme pressure and temperature, forming a sacrificial chemical
layer. The sulphur gives gear oils their characteristic smell.
5.
Will synthetic gear oils and mineral gear oils mix
together?
Yes, but beware that there two kinds of synthetic gear
available: polyalphaolefin (PAO) based and polyalkylene glycol (PAG) based.
PAOs are basically a man made version of mineral oils (although with greatly
improved properties) and can therefore be mixed with mineral oils. In fact,
semi-synthetic products have mineral and synthetic base fluids in them, so
obviously, they must be able to mix. PAGs, on the other hand, will not mix
with PAOs or mineral oil. Utmost care must be taken when using this kind of
product.
6.
What is a hypoid axle?
Hypoid is an abbreviation for hypocycloidal and relates to the geometry
of the crown wheel and pinion arrangement usually on rear wheel drive cars.
The pinion is usually highly offset to reduce propshaft intrusion into the
passenger compartment.
7.
Do I need a special oil for limited slip differentials?
Yes. When the power distribution between two drive shafts
is no longer equal (usually due to the surface condition that the drive wheels
are turning on, i.e. ice, mud), limited slip differentials are able to
effectively lock the two half shafts, ensuring equal power distribution once
again. When this limited slip differential mechanism kicks in there is a
high shock loading on the clutch mechanism that requires protection from wear
and slippage. Use of the incorrect oil can lead to clutch degradation and
vibration.
8.
Why should I choose non-EP straight oils for my classic
car?
Depending on the age, make and model non-EP gear oils may
be required for use in gearboxes and final drives. Certain designs contained a
lot of phosphor-bronze (copper containing) components that are sensitive
particularly to the sulphur extreme pressure (EP) additive. The sulphur
attacks the copper and destroys the integrity of the meshing gear surfaces.
9.
Is it alright to use ATF in a manual gearbox?
Certain designs do specify the use of an ATF in manual
gearboxes, but they should only be used where it is clearly stated by the
manufacturer.
10.
Is there one gear oil that will meet all my requirements?
This will depend on makes and models, but very often the
answer is no. Gearboxes, final drives, transfer boxes, etc., all have their
own specific lubrication requirements. The specification of the oil required
will be outlined by the design engineers, who will determine which type of oil
will provide the maximum protection to the transmission components. It may
certainly be possible to rationalise and reduce the number of lubricants used,
but the magical single product may not be achievable.
Top Ten Frequently Asked Engine Oil
Questions
1.
Can I top up mineral oils with synthetics and vice versa?
Yes. The synthetic fluids (polyalphaolefins) used in
engine oils are man made versions of mineral oil and are therefore compatible
with mineral oils. In semi-synthetic formulations, mineral oils and synthetic
oils are all part of the same formulation. The only downside here, is that if
you top up expensive synthetic oil with mineral oil you will be effectively
diluting the advantages that such an oil will provide (good cold start, good
high temperature performance and longevity).
2.
What is bore glazing?
Bore glazing is a condition that usually occurs during the
first critical hours/miles of an engines life. If an oil of too higher
quality is used and the engine is not subjected to the correct loading (light
loading is particularly bad), the honing marks on the liners can become filled,
making the bores smooth. With nothing to retain the oil in the bore, it will
begin to disappear down the exhaust pipe. Symptoms tend to be high oil
consumption, smoking and poor compression. It is possible to cure by adding a
glaze-busting additive to the fuel. If this fails, re-honing will be required.
3.
What is bore polishing?
When oils burn in the combustion chamber, they create ash
which is very abrasive. This can be particularly bad where high ash products
are used in engines used in high temperature, stressed conditions. The ash
effectively polishes away the honing marks and leaves nothing to retain the oil
in the bore. Once again, as with bore glazing, the symptoms are high oil
consumption, smoke and reduced compression.
4.
What is detergency and dispersancy?
Detergency refers to the oils ability to keep engine
components clean, particularly those in the hotter parts of the engine
(pistons, ring, etc.). The additive is referred to as a detergent.
Dispersancy refers to the oils ability to keep solid contaminants (i.e. soot,
combustion debris, etc) in suspension. This is necessary for two main reasons:
firstly it delivers the contaminants to the filter where the bigger particles
are removed and secondly it ensures that all the smaller particles flow out
when the oil is drained, leaving the engine clean.
5.
Why can't I use high detergent/dispersant oils in my
classic car?
Usually this will depend upon the type of filtration
fitted. If a simple mesh strainer is used on the pump inlet, low
detergency/dispersancy oils are a must. As previously described, dispersants
keep all the rubbish in suspension and allow it to circulate. Simple mesh
strainers aren't efficient enough to remove and so it continues to circulate
causing damage.
6.
What's the difference between a multigrade and a mono
grade?
The main difference between these two types of engine oil is their
fluidity at cold start. Multigrades, such as 10W/40, 15W/40, 5W/30 etc., flow
more easily and are therefore pumped round to the critical components (i.e.
valve train etc.) much more quickly. Historically the W stands for winter.
As well as this important feature, multigrades also have to provide a
protective oil film at higher temperatures when the engine has warmed up.
Monogrades on the other hand provide a very good oil film at working
temperatures, but their cold start properties are poor.
7.
What are API and ACEA specifications?
API (American Petroleum Institute) and ACEA (Association of
European Automotive
Manufacturers). These are North American and European
specifications respectively. They are compiled by the Original Equipment
Manufacturers (OEMs) and are recommended by them in handbooks to ensue the
correct quality of oil is used to protect their own particular engine designs.
8.
What do the SAE classifications mean?
SAE stands for the Society of Automotive Engineers. This is a
classification system used to categorise how thick an or thin an oil is. The
classifications are listed here in order of increasing thickness: SAE 10W,
20W, 30, 40, 50.
9.
Is there a special oil for turbocharged engines?
These days it is probably more appropriate to ask are
there oils available that are not suitable for turbochargers?, as nearly all
modern lubricants will protect turbos in petrol and diesel engines.
10.
In my car, if I use a synthetic product, can I leave it in
the engine longer?
No. Always refer to the vehicles handbook or seek technical
advice as far as oil drain intervals are concerned. The oil drain interval
will be assigned by the vehicle manufacturer and will take into account
filtration, fuel type, power output, etc. If the oil is mineral based or
synthetic it should still meet the manufacturers requirements and as such
cannot be used past the recommended oil drain interval.
Information kindly sent in by Michael
Horsley
Source: Morris Lubricants
PRE-OLYMPIC REGISTER
Malcolm McKay
It's great to report that the resurgence of interest in
pre-Olympics continues, with GTs still mostly changing hands for far more money
than in the past. It's also nice to see that there's still the occasional
bargain to be had for the canny buyers among us!
Brewery buys GT!!
The most exciting GT news for years, at least for the beer
drinkers among us, has to be the purchase of GT 263 UXG (featured in the last
mag) by J W Lees Brewery of Manchester (www.jwlees.co.uk). Still family-owned,
the brewers of the widely-known John Willies are a bunch of enthusiasts who
felt that a Rochdale car would be a great adjunct to their large collection of
Rochdale pubs! The plan is to restore the car and use it for promotional
purposes, then possibly give it away in a competition so keep drinking and
who knows what you might win
GTs Overseas
I'm sad to report that William Culbert has sold his bright
yellow Herald-chassis GT featured two issues ago; the consolation is that he
got a healthy £3850 for the car on ebay and it has now been collected by
Philippe Vermast of Luxembourg, who plans to respray it British Racing Green
(an original GT colour, so a choice I approve!) then fit a race engine (either
Triumph or Ford Kent) and go racing! William remains a member and is on the
lookout for an inexpensive original-spec GT.
|
William Culbert
(left) hands over his GT to new owner Philippe (centre) and friend
|
When his GT was for sale on ebay,
William was contacted by a previous owner with this photo of
it in its previous incarnation!
|
Meanwhile, Haiko and Ingo Jahns Herald-chassis GT better
known to members as the ex-Roy Dawson car has also crossed the channel, this
time for £2750 to Patrice Wattinne in France, who has also just bought a Phase
1 Olympic to add to a collection including Tornado Typhoon, Markham Peasey,
Microplas Stiletto, Ashley 750 and Fairthorpe Electron
Minor now that's a collection to make even me jealous!
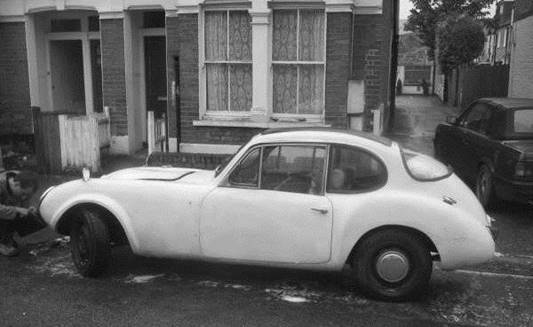
The Jahns Herald-chassis GT in London, shortly
before its recent move to France
The ex-Bert Tressel GT featured in the last issue has now
safely arrived in Japan and new owner Takatoshi Ichikawa is delighted with the
car. I'm very grateful to my Japanese friend Saiki Wada who has been to see
the car and its new owner, and sent the following report:
Mr Ichikawa was so pleased that the GT is in such good
condition. Also, he was impressed that the tweaked Ford SV engine is so sweet!
As the photos might suggest, he is a Porsche collector and
owns nearly 10 Porsches including 904GT and two '73 Carrera RS!'s He told me
that he had owned so many classic cars such as Alpine A110, R8 Gordini, Fraser
tuned Imp, several Abarths (he agreed that he is rear engine fanatic!). He is
not just a rich man, he knows cars and he said that the Rochdale GT is one of
the sweetest classics he ever owned! Let Bert know that his baby is in very
nice hands now.
By the way, he asked me whether he could get a set of
Ballamy Wheels. If you know someone who wish to sell, let me know.
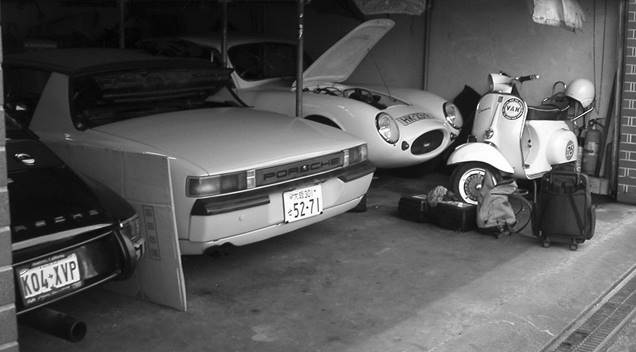
Takatoshi Ichikawas GT in good company in its new
Tokyo home
We look forward to welcoming our new GT owners in
Luxembourg and Japan to the club soon
Meanwhile, it's great to get a report from Tim and Colin of
the ROC German Chapter on another worthy rescue:
Thunderbirds Are
Go!
The call to "International Rescue" came in loud
& clear: "Rochdale to be scrapped by ex-pat in North Germany, please
help"!
I gave Bill (the ex-pat in question) a call & we did
the deal on the phone (yes, I know, one of those things you just don't do when
buying a car).
Bill's wife is German, so it was clear that we wouldn't be
spending Easter Friday, Easter Sunday or Easter Monday moving cars around in
full view of the neighbours (good Germans just don't do that sort of thing), so
on Saturday Parker (AKA Colin Breakspear) & Lady Penelope (me; hey, when do
I get to wear the trousers?) left the pink Rolls in the garage & got
Thunderbird One out for our day trip "up North". On arrival, we were
greeted by Bill, Bill's wife, a cuppa & the rear end of a GT poking out of
the garage. Further research determined that there was not much left of the GT
as Bill had broken it up to provide parts for his Martin restoration. We loaded
the bodywork, doors, windows & bonnet onto the trailer (in comparison with
my Olympic, the GT is a real lightweight), had another cuppa & checked out
the car's documentation. Another cuppa later & we were back on our way
"down South" in the direction of home, with the tune to "calling
International Rescue" ringing in our ears as we gobbled up the Autobahn
kilometres.
The documentation file revealed some useful information
which included the original registration number, photos, correspondence with
the original builder & an interesting cutting from "Practical
Classics" which detailed this car as being a GT Prototype (which it
clearly isn't)!
For everybody's information, the number of Rochdales
in Germany has now grown by 100% (from two to four), in the last six months
& all four are within 15 miles of each other! Achtung, here come the
Germans!
Tim & Colin (ROC, German Chapter)
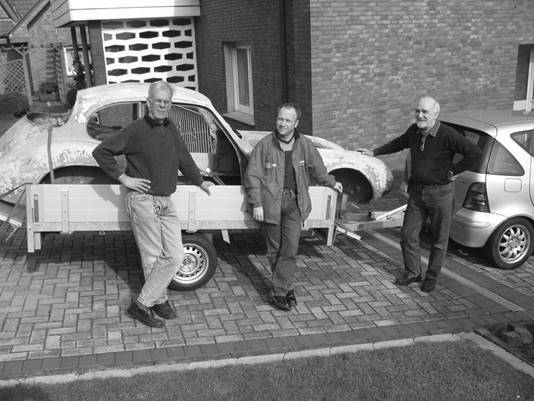
Bill Matthews passes
on the GT he'd taken to Germany to the ROC's German stalwarts, Tim and Colin Back in the US of A
Another GT that left these shores a few years ago is the
very attractive DAS 910 that now graces the website. Current owner Fran
Honeywell bought it from the importer (who apparently hadn't realised it was in
England when he bid on it, and lost quite a bit on the deal) and plans to race
the car a little when he's not campaigning various other race cars. He's been
quiet for a while so it was good to get the following message recently:
Greetings from America! My Rochdale has been collecting
dust in the garage for a while as I have just not felt up to another dose of
frustration and heartbreak.
I wanted to get your thoughts on something. The motor in the car is in
really poor condition. The valve guides are so worn I'm not sure what keeps
the valve itself from pulling through the hole. The cylinders are also well
worn and the head gasket blew the last time it was run. These flat head motors
aren't easy to find over here. There are parts around and if I really wanted
to I'm sure I could find something, but it won't be easy.
What do you think about swapping the flat head for a 948cc
Sprite motor and a 4 speed gear box? These motors are easy to find and I just
happen to have a few laying around that have found their way to me since I got
my Bug Eye Sprite. I don't want to do anything that will alter the car or
lower its value, but my thinking is, I have this stuff and it would drive much
better with a 4 speed box in place of the 3 speed tractor transmission. A
stock 948 only had a few more horse power then the Ford motor and it was
available when the car was built. This would also allow us to take 2 cars to
the vintage events and we could have 1 spares package for the 2 cars. I'd like
to hear your views and opinion. I want to make use of the car, but I need to
exorcize some demons before trying again!
This query touched on some interesting issues so my reply
is probably worth sharing, even though as his response shows it didn't entirely
apply in his case:
I completely understand your suggestions - but it's a
difficult one to answer, especially when it comes to the question of what could
devalue the car. As you may know, another GT that had made it to USA sold on
ebay a couple of months ago for some 16,000 dollars. It was an exceptionally
nice car, restored to a good standard with tuned Ford sidevalve running gear.
The new owner in Japan is delighted with it. Remarkably, four people were still
in the bidding above 15,000 - one in Japan, one in UK and two in USA. This is
by far the highest price ever for a GT, by the way.
A few weeks ago a yellow GT that had been transferred to a
Triumph Herald chassis and quite nicely trimmed out sold from UK to Luxembourg,
also on ebay, for 7000 dollars - also a very good price for a GT but, of
course, quite a lot less than the standard car (though it looked great in
photos, its condition was nothing like as good as the US car). So, it's
possible that changing to different running gear might devalue your car.
However...
Back in 1959, a little booklet was published by a young man
called Allan Staniforth, who has since written many respected books on car
suspension tuning etc. It was called 'BUILDING A "GRAN TURISMO"
SPECIAL' and related the story of how he built his own Rochdale GT for road use
and weekend competition. Now, Allan chose to use the 948cc A-series engine and
gearbox. He also used all manner of other different components and exactly
replicating his car (which does not survive as far as we know) would be a
monumental task - though it ought to make a very nice little car which would
surely be worth at least as much as a standard one...
The crux here is that, if you change the engine, you have
to do major, major work to get a usable, raceable car. This is because of the
limitations of the original Ford chassis design, which relies on the torque
tube and A-framed rear axle to take major torque and shock loadings from the
back axle directly to the massive crossmember under the back of the gearbox -
thus allowing them to use a very lightweight, minimally-braced, chassis from
the gearbox mounting back.
Even with that set-up, it was recommended that you box in
the channel-section chassis when fitting a sports body to the Ford chassis. If
you change the engine and gearbox, you have to change the torque tube and rear
suspension. If you change the rear suspension, you have to change (or heavily
modify) the chassis. One follows from the other - there's no easy way around
it. Consequently I always advise strongly against changes, because most people
who set out down that route never finish it.
Allan Staniforth's solution was to use just the Ford
chassis side members (for the simple reason that the Rochdale body is designed
to bolt easily onto them), box them in throughout their length and build an
entirely new set of crossmembers, braces etc onto them. At the front, he used a
narrowed Standard 8/10 crossmember to get twin wishbones, coil springs and
telescopic dampers, but fitted with Triumph
Mayflower larger drum brakes and adaptors to take the 15in Ballamy
wheels. At the rear, he fitted a Ford Pop axle with 4.7:1 crownwheel and
pinion, coil spring/dampers, twin trailing links, Panhard rod and Ballamy 15in
wheels.
A HUGE amount of work. Of course, you could leave the front
suspension alone (assuming there's enough room between the steering rods and
the front bulkhead to fit the A-series engine - otherwise you either have to
move the suspension/steering or the bulkhead (the latter would be best, because
you'd also get the engine's weight further back in the chassis).
As for rebuilding the Ford engine, there are specialists
who can do it; a fully recon engine is about a thousand pounds here (try www.smallfordspares.co.uk) - I'm sure they wouldn't insist on an exchange unit as
there's no shortage of used engines in the UK for £15-20. They also do a wide
range of tuning equipment. Expensive, but a lot quicker and easier than any of
the above options!
Fran responded:
As you may recall, my car no longer has the torque tube
and A frame rear axle. It has been converted to a 4-link rear suspension with
a "live" propshaft that looks suspiciously like the one in my Sprite.
It is really no big deal for us to rebuild the flat head engine in the car.
It will need to have the cylinders bored and bigger pistons fitted as the wear
is just too much to get away with just a hone job and new rings. The biggest
reason for wanting to make a change is the gearbox. The ratios in the 3-speed
box are just not suited for road use and a 4-speed box would make it easier to
keep the revs in a workable range. I don't know if the frame sections have been
boxed in the rear or not. I suspect not, but it's been a while since I was
under there. I'll have to go take a look when I get home.
My initial thoughts were to drop in the 948 and leave
everything else as-is. Any fabrication work would have to be bolt in without
axing things up. This would allow us to drop the flat head back in at a latter
date if need be. Nothing is going to happen with this thing until the fall as
race season is now in full swing and there isn't enough time to keep other
vehicles up and running.
It's always great to hear from you, but it was even nicer
to hear that the white car has left the U.S. and gone to Japan! That makes
mine a little rarer even if only in my eyes. I did speak to a guy last year
who told me he had a GT that was in pieces. I was at the races and was getting
strapped in the car when he came by. He was supposed to stop back later, but
never did and so I didn't get any additional
information on the car or the guy. I believe he lived here
in the States in Virginia. I'll keep you posted.
A final word from me: Of course - I'd forgotten that yours
already has a four-link rear end - that makes all the difference! In which
case, I see no problem with dropping the A-series in, if you can fit it below
the bonnet/above the gearbox crossmember! I guess you could always take a mould
off the bonnet and make another with a bigger bulge, if necessary...
Hope that chassis is boxed - the GT body adds quite a lot
of stiffness to the chassis but a four-link suspension on an unboxed chassis
sounds like it could get a bit unpredictable on the limit!
Ebay GTs in UK
NAS 438 appeared on ebay in early March but failed to meet
its reserve and I heard no more from either the vendor (in Kent) or the top
bidder. Blue, carrying a 2 September 1955 registration (which must be the donor
chassis) and bought on ebay from Thame two years earlier, it was described as
follows: This Rochdale GT is correctly registered as a Rochdale and is
currently on SORN. The chassis is in great condition and the brakes have been
re-lined with new brake shoes and all the linkages are working well although
the handbrake requires some modification. The bearings have all been regreased
and are in good condition. The suspension is all OK and the steering joints
appear OK. The wheels have been refurbished and have new tyres and inner tubes.
I was towed 10 miles to a new storage location and brakes and the steering
worked well with no rumbles. I ran the engine a year ago and it started fine.
The engine has been fitted with an Aquaplane head and twin Stromberg 125 carbs.
The starter motor was overhauled and the radiator was re-cored. The car will
want rewiring and the radiator and plumbing system needs remantling. The
interior needs refurbishing completely and I have a new pair of red bucket
seats to go with the car. The body work is sound although the doors need
refitting and there is some crazing to the fibreglass and the O/S rear corner
needs a repair.
Personally, I think the car might have sold if the vendor
had bothered to put the doors back on! When it was sold two years ago, it went
for around £1400 and has clearly had more work done, but quite a bit remains;
bidding petered out this time at around £1100. Here's hoping it returns to the
fold soon.
Unless you know otherwise, NAS 438 failed to change hands
on ebay this year
New GT owner
A welcome visitor to the stand at Capesthorne was Moraig
Butler, who had bought a GT a few days earlier on ebay. Moraig joined up on
the spot and we look forward to hearing how her GT ownership progresses. She
explained that she'd bought the car for sentimental reasons, having been born
and brought up in Rochdale, and she is looking forward to driving the car as an
enjoyable alternative to her modern car.
The car she bought escaped the notice of many on ebay as it
was only listed under parts for sale, so she got a real bargain just £127.
It seems to be a new car to the Register and remains a bit of a mystery. It was
listed as believed to be one of only a couple left in existence with the box
chassis. Quite what prompted this bizarre statement I don't know, but
subsequent correspondence elicited the information that it had once been fitted
with a Triumph Herald engine and has a transverse rear spring with wheels that
tuck in when jacked up making it pretty certain that the car is on a Triumph
Herald chassis, rather than one of those long-lost Rochdale square tube
chassis. It was sold with no engine or gearbox and the wheels in the photo are
clearly not Herald. My impression is that though it's not clear whether the
conversion was ever finished some thought has gone into the conversion as
wheels with a big inset have been chosen so that stuck-on wheelarch extensions
are not needed. The standard GT bonnet is fitted too, indicating that something
clever has been done to get clearance over the engine maybe it was mounted
further back with a shorter propshaft? However, later info from the vendor
suggested that it may be on a fabricated chassis and that no provision exists
for steering column or pedals, indicating that a fair amount of work may yet be
required.
The body looks pretty sound in the photo (though of course
only one side can be seen) and it seems the car has potential to become a very
nice GT after a great deal of work! The ideal choice in my view would be to
fit the 1147cc Spitfire engine and overdrive gearbox; these were on the market
in 1962/3, just a couple of years after GT production ended and closely match
the original Fords 1172cc while offering a good deal more power in standard
form as well as higher gearing for more relaxed cruising.
Welcome to the Club, Moraig, and good luck with your GT!
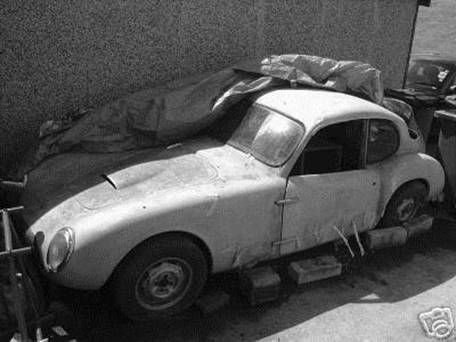
Moraig Butlers GT as advertised on ebay, now destined for
a new life in Bucks
OLYMPIC REGISTRAR
Derek Bentley
BMC Suspension Parts
The Phase One Olympics were designed to use either Morris
Minor (MM), Riley 1.5 (Riley) or Wolseley 1500 (Wolseley) suspension
components.
Whilst there is a degree of similarity and
interchangeability between these I felt that some more detailed information may
be of use to owners to either establish with what their Olympic was fitted or
what could be used as a replacement.
Front
Suspension
a.
Dampers: All phase One Olympics use Morris Minor
dampers, which also form the upper suspension link.
b.
Lower suspension arms. These are identical on MM,
Riley and Wolseley models.
c.
Swivel Pins : Riley/Wolseley differ from MM components
in the location of the steering arm. The casting has two bosses, either or
both of which will be drilled with a tapered hole for the steering arm. The
Riley/Wolseley use the upper boss, whereas the MM uses the lower boss.
Dimensions of the steering arms also vary (see below)
d.
Trunnions: Trunnions, bushes etc. are common to all
three models and interchangeable. However, beware of the following if buying
NOS from autojumbles etc.
1.
Threads on link pins etc have varied between BSF and UNF over the
years, so be careful to use the correct nuts.
2.
Trunnions marked with a spot of red paint indicate they are
oversize and were designed to be used with swivel pins that had been re-cut
undersized to recondition them.
e.
Hubs: Hubs, bearings and oil seal are common to all
models. (Also used on A35, A40 and steel wheeled Sprite/Midgets)
If a thin spacer (up to 3mm) is necessary to give
clearance when fitting non-standard wheels then the longer wheel studs from the
rear hubs can be used.
f.
Torsion Bars: These are interchangeable between MM,
Riley and Wolseley, although their diameter and hence the spring rate varies.
Morris Marina torsion bars will also fit and is one of the few interchangeable
components.
Dimensions of the bars are as follows:
Riley/Wolseley 0.750
dia.
Marina (early) 0.750 dia. MM 0.780
dia.
Marina
(late & van) 0.813 dia.
Yes it may seem strange, but the Riley/Wolseley bars really
are softer than the MM items (by 12% - Ed). Rear fixings for the
torsion bars vary, so retain what is compatible with the body under seat
mountings within the shell.
g.
Steering Arms: The Riley/Wolseley arms are a different
shape to the MM items. Viewed from the side the Riley/W arms are virtually
horizontal, whereas the MM items kick up to the rear. The MM arms are also
shorter.
The majority of Riley/Wolseley arms are of a much larger
section than the MM items, with a correspondingly larger tapered end fixing to
the swivel pin.
Some early Riley/Wolseley components were of a smaller
section, although still of the same shape and have the same size tapers as the
MM items. If using the two holed swivel pins in a Riley/Wolseley application,
then the earlier smaller section arms will be needed.
h.
Brakes (front): MM and Wolseley components are of
Lockheed manufacture with adjustment by means of a snail cam adjusted with a
screwdriver through the hole provided in the brake drum. Riley components are
of Girling manufacture with adjustment by means of a square headed adjuster
fitted to the backplate.
Brake drum diameters are as follows:
|
MM (pre 1963)
|
7" dia. x
1.25" wide
|
|
MM (post 1963)
|
8" dia. x
1.50" wide
|
|
Wolseley
|
9" dia. x
1.50" wide
|
|
Riley
|
9" dia. x
2.25" wide
|
The brakes are interchangeable as complete assemblies (ie.
Drum, backplate, shoes etc.) and hence the larger Riley or Wolseley brakes can
be fitted in place of the smaller MM ones.
If disc brakes are required any of the kits sold by Morris Minor
specialists should fit, although the brake pipes may need different threaded
ends. It may also be necessary to change the master cylinder for a different
bore. I would suggest you consult the supplier of the kit.
i.
Brakes (rear): As with the front brakes MM and
Wolseley components are of Lockheed manufacture with adjustment by means of a
snail cam adjusted with a screwdriver through the hole provided in the brake
drum, whilst Riley components are of Girling manufacture with adjustment by
means of a square headed adjuster fitted to the backplate.
Brake drum diameters are as follows:
MM 7"
dia. x 1.25" wide
Wolseley 8"
dia. x 1.50" wide
Riley
8" dia. x 1.50" wide
Post 1963 MM front drums are the same as Riley and
Wolseley rears.
Early Sprite/Midget rear brakes are the same as the MM
items, whilst the later type Sprite/Midget rear brakes can also be fitted as
complete assemblies.
j.
Rear Axle: Rear axle casings, including hubs and half
shafts are common to all three models. The casing is modified by the addition
of welded brackets for suspension mountings.
Strengthened half shafts are available from some Morris
Minor specialists and might be a worthwhile addition for those Olympics with
large engines or wide rear tyres.
Hubs and bearings are also common to A35, A40 and
Sprite/Midget, but not the half shafts.
k.
Differential: All BMC A series differentials are
interchangeable and therefore several ratios are available. Only the higher
ratios are likely to be of interest to Olympic owners.
3.727 11/41
Riley and W
3.900 10/39
Sprite/Midget (1969 onwards)
4.222
09/38 Early Sprite/Midget and late MM
A 3.55 ratio was also produced and sold by Heathrow Sports
Cars until recently and is still available from Moss at £323. Moss will also
sell you a Quaife limited slip differential at £675 !! For a cheaper option
Cambridge Motorsport sell what is called a Phantom Grip unit for £220, although
you do need to assemble this into the differential yourself.
l.
Steering Rack: Riley/Wolseley steering racks have
flanged ends for attachment to the subframe, whereas the MM uses a U bolt clamp
arrangement. Hence subframes vary to accommodate these different attachment
methods. Mounting heights are also different due to the location and different
shape of the steering arms.
With the Riley/Wolseley rack the tyres usually rub on the
anti-roll bar on full lock, something that doesn't seem to happen with the MM
set up. (The dreaded Ackermann or lack of it on the R/W ! Ed)
m. Track
rod ends: Early MM used a smaller diameter thread to fit to rack than the
later ones. Later MM and Riley/Wolseley items are identical.
n.
Wheels: MM and Riley/Wolseley wheels are 3" x 14"
dia. Piercing of the wheels was an optional extra and consists of 8No x 1.25"
dia. holes arranged in pairs.
Later MM vans used 4.5" x 14" dia wheels, although these
are rare and sought after (ie expensive) A35, A40 and Sprite/Midget wheels are
3" x 13" dia and have the same stud diameter and 4" PCD as the MM items. They
use nuts with a different taper however so make sure the nuts match the wheels.
Phase two wheels are 4.5" x 14" sourced from the Vauxhall Victor. These need
special nuts as the Vauxhall used a larger diameter stud.
Whilst the above is not a comprehensive list of
interchangeable components it will hopefully act as a starting point.
* * * * * * * * * *
* * * * * * * * * *
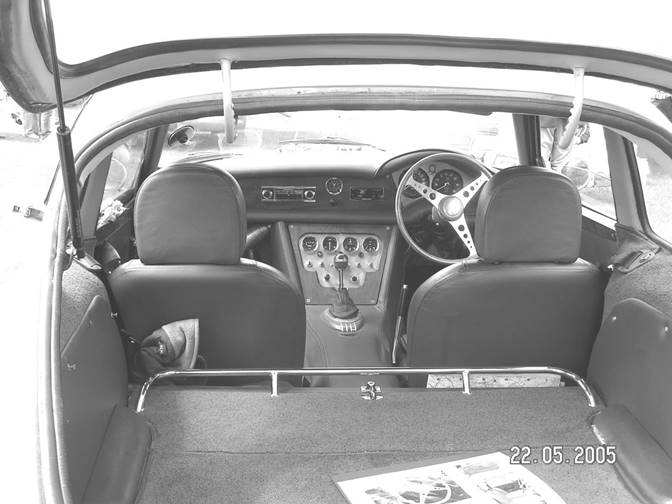
The very classy interior of Les Browns Phase 2 at
Capesthorne
Copyright © Rochdale
Owners Club
Last Update